Archive for February, 2015

Today as I was driving to work I heard on the radio that my musical mentor turned 65 years old today.  I can remember exactly where I was when I heard my first song by Genesis.  I was in the shower and could not believe what I was hearing on the radio.  It was unlike anything that I was familiar with and I had been a musical sponge for years!  New sounds, a driving intricate beat, lyrics that never once mentioned boy meets girl, boy loves girls, girl leaves boy or other popular themes. I was stunned and delighted.  I got out of the shower and listened to the rest of the song.  Immediately I called my best friend and he had been listening as well.  We were both truly jazzed.  Over the years I have studied and enjoyed not just the music but the recordings and the style.  I have followed Peter Gabriel ever since.  A great musician, talented performer and powerful voice and above all that, he is what I affectionately call a decent human being.

If you are not familiar with his work, I encourage you to take some time out of your busy day and on his birthday, celebrate his accomplishments. I can offer suggestions in a future post and review, but I guarantee it will be time well spent.

Now that we have our Master MIDI controller (‘Controller,’ ‘Keyboard’, ‘Triggers’, ‘Percussion Pads’, ‘Lighting Boards’ , etc.) connected to the receiving devices (‘drum module‘, ‘tone generator’, ‘lighting system’, ‘keyboard’, ‘sampler’, etc.) we should be able to trigger each receiving device from the Master.  Most receiving devices will have some sort of LED or other indicator to let you know the external device is receiving data.  If we set up as described earlier, changing the MIDI out channel on the Master will send the performance using that new channel.  Each receiving device stays on its designated channel. 

If you are recording, this will allow you to set up each MIDI channel to a MIDI track in your recorder, ‘DAW’ or PC – using internal sounds and ‘plug-ins’.  Track 1 to channel 1, track 2 to channel 2.  If you want to record more than a few times and over periods of time, work out and write down the channel assignment. That way your tracks will follow and will be easier to record and mix in days to come.  

Because drums are on channel 10 by default, that takes care of one!  As a suggestion, for one type of band configuration, set up 1 as the main MIDI chordal instrument sound.  Think main piano or organs.  Channel 2 can be strings or pads, 3 can be brass, 4 can be choir.  You pick what types of sounds your projects normally use and this will help get a recording and playback work flow. 

Most MIDI tone generators can play more than one sound and more than one type of sound at a time.  You may only have one tone generator or a PC that has all your sounds.  You may have many modules for specific instruments like piano or violins or drums.  There are a lot of cool toys for more complex MIDI rigs, and each has a unique ability to process or route data between devices.  Set up the recording templates as desired for the projects you take on.  Use the template to help you get started sooner. 

Once you have recorded each MIDI performance – assigned to individual track/channel – SAVE it!  LOL.  Each track should have its own MIDI channel and when you hit Play, those tracks will recreate the performance and send to all 16 tracks at a time.  As you Mute a track, you stop the playback of that channel. 

Once I ran sound and lights for a hi-energy keyboard heavy band.  I took a portable MIDI recorder and recorded the keyboard players performance.  Then I played each song over and over while I used the performance to sequence the MIDI lighting board we used.  That way when the band played through their set, I would start that song’s sequence and let it do the lights as often as possible, because it reflected what the band was playing better than random or volume based light patterns. (and because it was easy) If they changed the set I would pull up the sequence list and hit play when they started.  

Because there needs to be a direct wire connection between MIDI devices, it actually makes this much easier, but you just need to plan ahead a little.  For simple systems, setting up will be a quick foundation for more complex and growing systems.  In the most basic systems, you will have a controller or device that will transmit MIDI to another receiving device that will be able to respond to the MIDI data.  If you only have one controller, trigger or MIDI device, there is nothing to set up.

So we have examples of MIDI-equipped devices that will be the Master in our set up.  Words like ‘Controller,’ ‘Keyboard’, ‘Triggers’, ‘Percussion Pads’, ‘Lighting Boards’ can be translated into the devices we will play or perform on.  Keyboards can be used to trigger drum or trumpet sounds or even light boards……..  Drum Triggers can be used to play loops or sampled sounds.  Keep in mind MIDI will transmit (and/or record) the physical performance to other devices.

To make sure each device ignores the data going to other devices – yes, remember the 16 channels traveling through each MIDI cable?  Here they come in handy.

If we go back to the basic setup, the Master can be set to transmit MIDI to those possible channels in a number of ways including;

  1. Send No Signal at all (OFF)
  2. Send to any one of the 16 channels
  3. Send to more than one channel

So first, we want the Master to talk to one external MIDI device.  As long as the Master and the receiving device are set to the same channel, the device will respond to information from the selected channel(s).  It is easy to start with channel 1, and many manufacturers will set their default to transmit on channel 1.

There are always exceptions and some become standard features by popularity.  Drum machines were commonly used on channel 10.  So connecting a drum machine or percussion triggers to a ‘drum module‘, use channel 10.

Most MIDI receiver devices will be able to respond to signals in a number of ways including;

  1. No channels (OFF)
  2. Listen to any one channel at a time
  3. Omni – listen to all 16 channels at once

If you have problems getting receiving device to respond, try #3 above.

As we add devices we can +1 on the Master out channel to send to other devices now in the chain of MIDI cables connecting each device as described briefly earlier.  Set each new receiving device to listen to that channel only (in common and standard systems).

Next series let’s go over recording and playing MIDI performances.

Midi_ports_and_cable

I have seen a lot of confusion over the discussion of MIDI.  Many of us know what it is and how to use it, but we keep on learning new ways to take advantage of this amazing communication protocol.  New MIDI equipped products are hitting the market every year, but if you are starting out or curious you probably just want to know what is MIDI really?

The definition is rather simple; Musical Instrument Digital Interface.

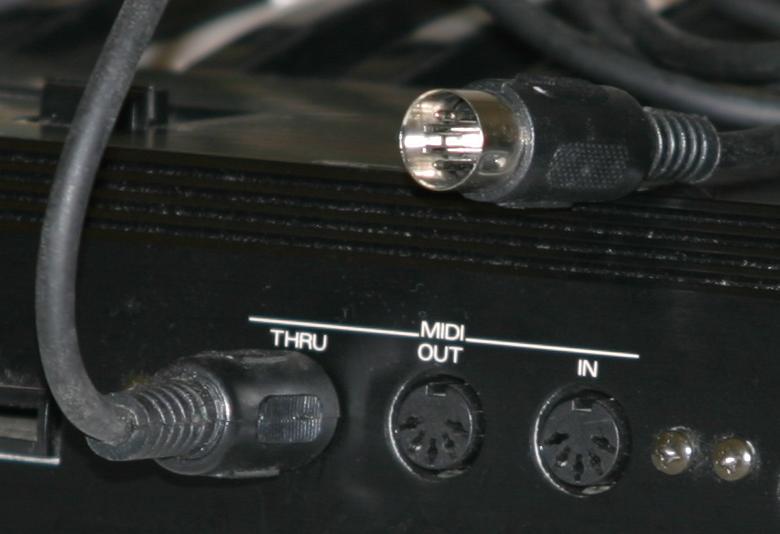
It is a way for devices that have the MIDI feature to communicate to other devices that have the same feature.  Typically you will see the following ports on the devices:

IN

OUT

THRU (also an out, put this is a pass-through from an external MIDI device)


These simply let you know where the flow of communication is headed.  These ports and the cables connecting them communicate one-way.  If you want the 1st device to send MIDI data to the 2nd device, connect the OUT from device 1 and connect it to the IN of device 2.  To have the same data from 1st device also sent to a 3rd device, connect the THRU (out) from the 2nd device to the 3rd device’s IN port.


MIDI has set up 16 channels for separate communications within each device.   Now, here is the kicker.  What does it do?


The confusion comes from the idea that MIDI allows you to record or transmit and layer sounds.  Try to think of it this way – MIDI transmits physical activity applied to the device.

It has no sounds.  It makes no noise. 

But if the player or performer plays a keyboard as the 1st device, MIDI will transmit the physical movement of the keyboard …. This can include what key(s) on the keyboard, how fast or hard they were hit, how much pressure was applied to the key(s) while they are held down, how long it was held, if the sustain pedal is pressed, if the modulation wheel is moving and a lot of other information.  When you capture or record the MIDI data of the performance, it will play back those movements.  If the 2nd device is a tone generator or sound module whatever sound is selected will respond to the MIDI ‘performance’.   If you change sounds, the performance will be in the new sound.

If the 1st device is a drum pad or trigger, the same thing applies.  The trigger will send MIDI data detailing which trigger is used, how hard it is hit and in some pad designs it will detect the area of impact and will trigger multiple sounds depending in zone and velocity of the strike.

I will continue the over view later on in this series. 

I would like to share a number of experiences and lessons I have learned over the years.  My friends call me a closet teacher.  Teaching is just something I love to do.  If I learned it, so can you.  And I have learned a lot about ‘running sound”.

I am fortunate to have had experience from four distinct points of view.  Each is an important but uniquely different facet of the big picture called ‘Live Sound Reinforcement”.  From spending a lot of time in each area, I was able to see how they all fit together and how we can make the job easier and improve the understanding and control of running sound for a live performance. 

Here are the four main branches in no particular order as you will see.

Studio engineer – controlled environment, fancy equipment (that never gets moved or unplugged) and time to ‘ rewind’ and try again.

Live Performer – need to hear ‘me’ more than others but need to hear others.  Loud volume, “in the moment” energy and excitement.  Changing environments and equipment.  Group or team involvement

Sound Reinforcement – make what the band/act is doing on stage sound good and not too loud in the audience of varying sizes and in challenging environments.

Audio and Instrument Sales – newest and coolest toys, contacts with company reps and training seminars, clients that are great musicians.

I have been combining these four branches for years.  If I run into difficulties in a live situation, I can set up the equipment after a gig and recreate the problem.  Then with no live audience or making sure the show goes on kind of pressure, I can look for a solution.  Sometimes it is more gear (or often just the right gear), sometimes a different cable or patch, sometimes a talk with the band members (LOL).

I will not go into heavy technical background or graphs unless I have to, but there are great references on line if you want to get details.  If you are starting out and do not have a lot of experience (or any) you will benefit quickly from this series and will be able to pick this up in no time. 

My name is Michael and studio friends call me MIDI Mike.  Welcome to MIDIMike’s Live Sound Reinforcement series.