Posts Tagged ‘#signal’

5244810_1436551652.1907_funddescription5244810_1436551640.5363_funddescription

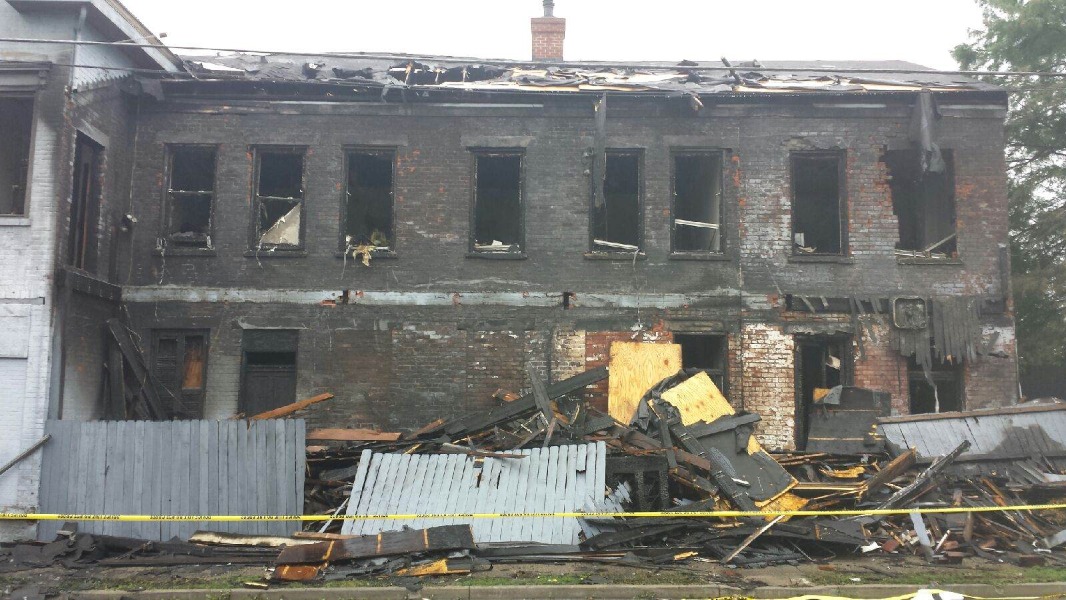
I have shared a number of experiences that have been about loss. Unfortunately, when you get older, you have more experiences watching the achievements of a life’s work and loves dissolve.  There are many types of loss and a personal friend of mine has been going through a very difficult time.  I just needed to share my experience and thoughts. Over these posts I have often mentioned working at local music stores and the benefit of knowing some awesome people. One of the friends I worked with for years and formed a great partnership “co-owning” the music store with all those years ago has had a devastating loss. As social media is …. he found out from friend’s texts and e-mails that while he was traveling, his house burnt down. His job is demanding and a lot of people depend on him to be there. He could not get home and as we all need to do from time to time; he had to rely on his friends and family (many times they are the same thing).  He is still away and has not seen his home other than on the news and through social media.

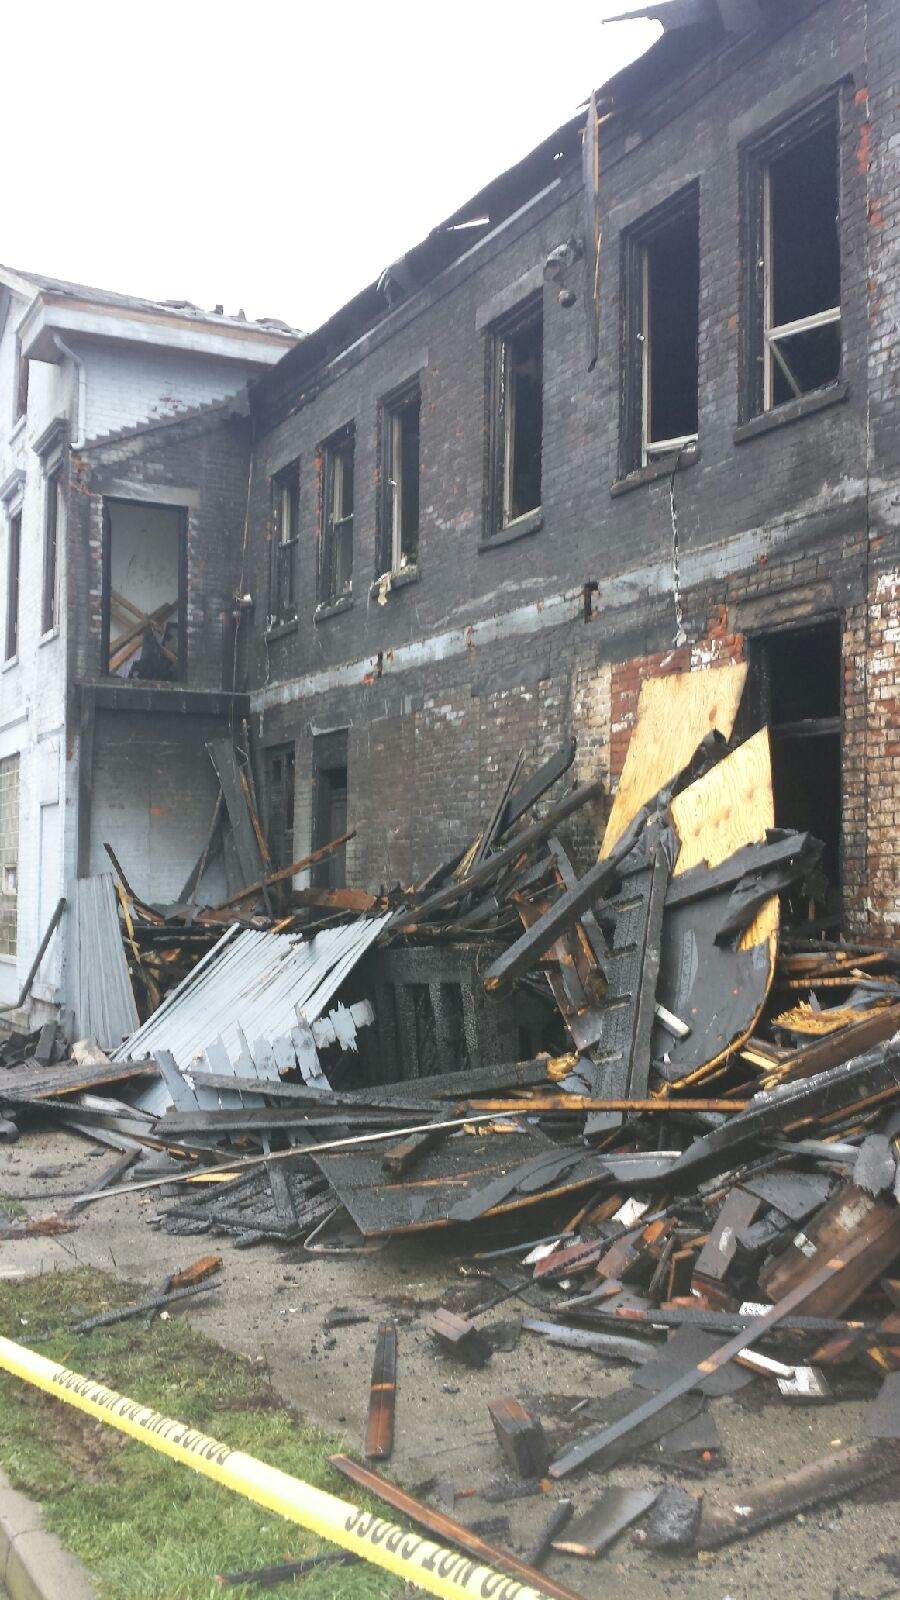
I would like to let you know that we have successfully completed the ‘search and rescue’ mission.  We got anything we could out of the building during the days of rain with holes in the roof.  It was a scramble with trusted friends.  We hauled ass and a bunch of other things.  Some musical instruments are damaged beyond use or repair and some have hope of restoration or managed to remain untouched by the whole thing!   He is a musician and like me has an insatiable love for art, music, friendship and making the world better than it would be without us in it.  This has got to be devastating.  For me, carrying out each old and precious instrument or piece of gear,  had a deep impact.  Others worked on his art and personal belongings.  I have heard their stories and all have a deep sense of loss.  No one was hurt.  Many things can be replaced.  But as the fire and then the water took their toll, a lot of his life’s work did dissolve.

We are working now on cleaning and saving as much as we can.   As my daughter Alisa, who runs my blog, practically grew up in the music store and all my friends, she has known John Van Eaton almost her entire life.  She is creating a positive use of social media and spreading the word through this and other avenues.  We will have a number of benefits to raise money and support to help him work through this until he is able to come home and the resources he will need once he returns.  I will post more info as details come in and thank you – fellow bloggers – for letting me share this with you.  The sharing allows healing.

 For more details or to contribute to his fund, see below.  MIDIMike

Most of the connectors used for outputs will be 1/4″ male jacks.  These can be for ‘grounded’ (three-wire) or two-wire cables.  To make this part confusing, the cables can be made or changed with adapters to almost any connector type.  For long distances we prefer grounded or three conductor-wire cables as the third wire is used to take common signals from the other two wires, and ‘dump them to ground’.  Common signals would be interference and noise as the plus and negative wires are carrying the signal from the board.  The result is good signal with low noise introduced.  Guitar and keyboard cables typically go shorter distances and typically have a higher or stronger output signal than a microphone for example.  The cables in the snake will use three wire grounded shielded cables even if they are 1/4″ male connectors.

So we might expect to have an XLR connector for the Main Outs to the Main House power amps, but this is not a guarantee.  If 1/4″ jacks are provided it is recommended to use grounded three wire cables.

Most cables will provide a male connector on one end and a similar but female connector on the other end.  Male connectors are often used to connect to In-Puts and Female connectors are often used to connect to the Out-Put.  The male connector of the microphone cable connects to the mixing board In-Put and on the other end the female connector will connect to the microphone out.  Generally speaking there is little advantage plugging an in to an in or an out to another out.   I like to state the obvious LOL!

The mixing board will give us a Main Left and Right out, and probably a Mono Main Out.  These will be connected to the Main or House power amps.  During an event, the amps are usually turned all the way up and the House volume is ultimately controlled by the Main L-R faders on the mixing board.  This is why it is important to turn the Master Volume Faders on the mixing board all the way down whenever connecting or disconnecting equipment or making dramatic changes.

Depending on the board size and configuration you may also have a 1/4″ Direct-Out for many if not all input channels. (this is REALLY cool for recording and a lot of other creative uses…)   These can be really handy for independent channel recording, triggers, audio effects and alternate mixes to name a few.  Basically connect these to external recorder, processor or triggering gear as needed.  I will give some examples as the series expands to other main topics.  You will also have a number of Sends that are used for a variety of tasks and have different names, but with a few configuration details are for the most part the same thing.  Effect Sends, Monitor Sends, Auxiliary Sends, Sub Sends are splitters; they split the signal – keeping the one going to the House or recorder – and allowing you to send a lot or a little of that signal to the Send of your choice using the Send knob. As in the Monitor amps and House amps, the volume knob will ultimately be used to send the proper signal level to the external (and internal) devices or effects.  If you ‘send’ this to a digital delay, it may also have its own input and out put level knobs.

You may also have a two-track input and/or out put.  This is for playing stereo audio devices and for a straight stereo record out option.  Handy to listen to practice tapes, intermission music, PA system tests and other performance related media.

The sound board or audio mixer represents the hub in most audio mixing and mastering functions.  everything connects to the board.  Even the lighting system will use channels in the snake to connect from stage to console.  Things get plugged into and things get plugged out of the mixer as needed.  Today’s mixers are blue tooth USB WiFi fire-wired and light-piped together and will connect to an amazing array of devices.  So far we have focused on what gets plugged to the Inputs of the sound board.  There are a number of connection possibilities for the Outputs as well. We have already discussed some of them earlier, so this can be brief as you already know a lot of this in general.

On most sound boards you have a number of analog-out options.  In earlier discussions we talked about XLR and 1/4″ cables and connectors.  These will continue to be the main ones used for outputs.  On the front or face of most mixing boards you will see a stereo headphone out.  It will usually have its own volume knob and probably a selector to pick the options to Monitor including Stereo Out, Solo, Effects Sends, Effects Returns, Sub or Groups, Auxiliary Returns, and other options.  On the back or the top of the mixing board you will see the panel for Out-put connections in different sections.  There are some rules to determine what type of Audio Cable is used and whether it is a male end or female end and whether it has two connectors or three (or more).

In the early days of mixing boards, microphones and keyboards, it was important which brand you purchased.  If you wanted to get ‘that sound’ you had to have this mixing board channel strip or that particular keyboard.  Later on the computer industry similarly shot through their early days and you had the Macintosh or the Windows PC.  If you were brought up with one you could not be talked into the other.  Most modern equipment from PC’s to Automobiles can do everything.  They all have similar platforms and emulators.  There is style and quality as there always will be, but you can get software mixing programs and microphone/guitar emulator plugins that will make your audio tracks sound like anything you want —-THEY CAN EVEN MAKE YOU SOUND LIKE YOU ARE SINGING IN TUNE!!

So if you like Pepsi, no problem.  Want Coke?  Press this button……  More comfortable using a Mac?  Go for it.

All it takes is cash, a thorough understanding of what all the terms mean and a good idea where all the buttons are?!!?

Enjoy!

I am famous for doing things the easy way and if I can, as cheap as possible.  Now that does not mean forget quality and versatility.  It means I won’t spend money on gadgets that I don’t need.  I try to run as clean a mix as possible, and making sure everyone gets heard.  If they are up there ‘playin it‘, I want the audience to hear it.  In reality, it doesn’t take a lot of gadgets to accomplish those two major things; make it sound good and loud enough for the venue, and put all instruments/vocals/strings/spoons or tambourines, I don’t care what it is….  in the mix.   As a band member, hiring sound guys and their rigs, a number of times after sound check and a few songs of the first set, my microphone was turned down so low, no one could hear me even in-between songs.  I could not get the sound man’s attention, or anyone else’s for that matter because no one could hear me (and as a keyboard player I was usually in the back corner of the stage in the shadows Ha!).  So eventually I just adjusted the microphone stand down toward the floor in front of me.  It is easy to hit the wrong button or turn the wrong knob; happens all the time.

Remember that the sound guy cannot hear what is really happening up on stage.  Sometimes you THINK you can.  But you as the sound engineer should be the first person to know what is going wrong when it does.  Keep an eye on all performers – they will look to you first.  As a performer and studio guy, I could tell when the guitar player broke a string, or if the drum head split and when or if the drummer had too much to drink on his birthday gig.  Things will go wrong but a lot of the time it is the sound guy.  You make an adjustment and grab the wrong knob.  They all look alike in the dark part of the venue or room.  The consequences can be anything from a non-event to a full blown crisis, depending on which knob you grab.  Obviously for the extreme crisis, you will know right away what happened and will probably be able to correct quickly.

It is the slow creepy ones that will get you.  Two songs later something changes on stage and chaos begins.

I suggested we set up the mixing board so the FX Returns are plugged into open channels so you can control their volume with the faders rather than the FX Return knobs.  I always turn the effects down in-between songs.  (you also get EQ and other benefits)  This makes it SOOO much easier to see in the dark clubs. I also use the sub-groups to assign drums, vocals, and other groups of mics their own fader that feeds directly to the Main Out or house out.  If there is a problem with one group, you can quickly test by adjusting that sub-group fader and see if problem goes away.  If not, return it to where it was and go to the next sub-group.  This way you do not have to go through fader after fader searching for a bad signal or feedback loop.   Once you narrow down the offending group, you will have a much better idea what the source is!

I would say most live performances the sound board is mixed to a Mono output.  In smaller rooms or clubs, I loved running in stereo.  I mixed for keyboard progressive bands a lot and the stereo keyboards and samplers consumed the rooms when mixed right.  Not in volume——– The vocals (sometimes three sometimes five in the band) panned as well.  Overkill in a way, but not much work and easy to arrange with equipment versatility.  Most boards have stereo FX that can add lot to the imaging.  But again, that is not the norm.  So you can either set board up in stereo and have the Main Output plugged into the MONO OUT to your system, or you can mix to mono and use one Main fader or the other.  That’s about it.  We have covered the entire mixing board, in its basic format.  Headphone outs, Tape or other inputs, on-board effects, Solo or Audition functions as well as digital features make new sections.

As we continue down the signal path, we get to a new section.  This is separated from the EQ section and generally uses a different color coding for the associated knobs.  The next group is the Aux Sends.  Each send represents an output jack that will go to external audio sources. One example would be the stage monitor mix(s).  If you have two monitors on each end of the stage serving performers, you can use Aux Send 1 going to the left monitor and use Aux Send 2 going to the right monitor.  If performer 1 wants to hear themselves and a little bit of performer 2 in the same monitor, simply send a lot of performer 1’s channel to Aux Send 1 and a little of the performer 2 to the Aux Send 1.  If performer 2 does not want to hear performer 1 in their respective monitor, simply turn up performer 2’s channel Aux Send 2 up a bunch and do not turn up Aux Send 2 on the channel for performer 1.  That was probably harder to say correctly than actually doing it.

Three

You can use Auxiliary Sends to route a signal from any channel to external effects boxes like Digital Delays, Reverbs, and even recording devices in a pinch.  You can use it to trigger light boards that have an Audio Input mode.

These Auxiliary Sends can sometimes be switched from Pre to Post.  Some are fixed either way.  This can also get confusing but if the channel Aux Send is in Pre mode it means Pre-Fader.   The volume faders on each channel will affect the level of the signal that is sent to the House or the Main Out of the mixer and when selected, to the headphone out.  It is a good idea to solo instruments in the headphones to pick or change microphone locations and isolate room noise and other performers.  If the Aux is set to Pre-Fader, it means that the Aux Send levels will be determined before the channel fader has any effect.  Turn the channel volume fader all the way down and you will still have plenty of signal going to the Aux Send.   If the Aux Send is in Post Fader mode, the amount of signal sent to the Aux Send for that channel will be directly affected by the level of the channel volume fader.  Fader off = no Aux Send level.  The number of sends will vary widely.  In this case, more is better!

At this point the example starts a new section.  This will affect the Main Out section.  This is where we can set the stereo Pan position, Mute or un-Mute the channel, and Solo the instrument for gain staging and troubleshooting during a performance.  When running in stereo, general rule is very low frequencies get panned to center.  After that, adjust to performance and venue.  Sometimes the stage sound is very loud, and listeners close to the stage will only be able to hear that performer.  Sometimes the shape of the stage or design of venue will require creative solutions using stereo panning.

This strip includes a pair of colored LED’s for signal strength and Peak warning level indicators.  Occasional red for short periods of time are OK, but better to avoid as long as you have a strong signal otherwise.  After we have set the various knobs correctly and have good signal strength, we can use the channel volume fader to set the level of that channel in the House mix.   Channel Mutes can have different affects.  Some boards Muting a channel will stop that audio source from all outs, and some might allow Aux Send 1 & 2 for monitors.  See manuals for lots of details I cannot cover in these articles.

Other examples below with different lay-outs;

TwoOne

But here is the good news;  we have just learned 75% of the face of the mixing board.  Each channel duplicates what we just went over.  All those knobs are now grouped logically, easily identified explained and we understand what each one is for.  Here on in it is repetition for gain staging and sound check.  Use Pad and 1st Gain Stage to adjust signal strength, add or subtract frequencies using the channel EQ, set amount of Aux Send to monitors and effects and set the stereo field positions as we watch level indicators and set channel volume fader.  Repeat.  Finished!

Next we can go over the benefits of Group Sends and the other 20%

Again, there are lots of guidelines about setting EQ.  But don’t let this confuse you early on.  Basically, this is a fancy way to change the tone of the signal.  Knobs that are tied together in brackets work together. One determines the frequency range that will be affected and the other knob determines how much boost or cut will be applied to the selected frequency range.  The first instinct is to turn everything up.  Indeed this is quite natural but wrong.  Test after test, many people will say one sound is better than the other even though the only real difference is the higher or louder volume level.  If you think of boosting the frequency group with the EQ as if it were an amplifier turning the frequency group louder, this will help explain why we needed the extra head room when setting up the gain stage – you are making the signal louder when you add EQ boost.  If everything is set and you boost a channel EQ, you can unintentionally overload the input level on the EX send for example, causing that signal to distort or clip when returning back to the mix.

In this configuration there is a hi frequency group cut/boost knob.  Then there are hi-mid frequency knob tied to a cut/boost knob and below another pair in the Low-mid frequency range.  Underneath that is the low end group cut/boost knob.  In essence, select the amount of cut or boost on the frequency groups (Hi – Lo) to shape sound so it reflects the source signal.

For the paired knobs, select the frequency to be affected and using its pair cut or boost that particular frequency (as opposed to a larger group of frequencies for the Hi-LO knobs).  Keeping in mind sometimes less is really more, rather than try to turn frequencies up or louder to make them sound better, try making them sound bad.  Which frequencies interfere with the shape and tone of the instrument?  Does a certain frequency make a nasty squawking sound when it is a bit louder?  Try cutting that frequency a good amount.  You might be able to turn the channel volume up after cutting signals and keep the level not necessarily louder over-all in the mix but in the correct group or place in the instrument/vocal mix.  Listeners will be able to hear the instrument clearer and more distinctly if it closely resembles the real instrument’s group. So this gets pretty easy.  Like a simple home stereo, turn the top know to clockwise to make the sound brighter by increasing the hi frequency group.   Turn it counter-clockwise if it sounds harsh or brittle in the upper range.  The paired knobs allow you to select specific frequencies within a group (Hi or Mid) and then cut or boost to shape the tone of the source and add flavor or reduce gremlins.

For microphones that will be used by vocalists, this is an area where you can make a lot of difference because the vocalist signal is also being sent to the on-stage monitors.  Sometimes they are really loud.  And when that happens, the monitor is blaring the vocalist’s signal right back into the microphone on stage.  This in turn goes quickly to the monitor and straight at the microphone again.  Soon this will turn into a squeal in the range that is strongest or loudest.  This is the classic example of a ‘feed-back loop‘.

The knee-jerk reaction is to turn the channel volume down or turn the monitor sends down.  The better way is to learn which frequency/frequency group is triggering the loop first.  Use the paired EQ knobs to change the hi-mid or lo-mid frequency responsible for triggering the nasty loop.  Successfully done, slowly turn the volume up a bit.  Slowly increase volume (usually to the monitors, but will apply to the House Mains in some situations) until you start to hear a feed-back loop starting.  Determine which frequency it is and turn it down in the mix. You want as much clear gain as you can to the performers. If you can only turn Monitor Send up to 5, let’s say or you get feedback, the performer might not be able to hear themselves over the amplified instruments and will be forced to scream louder and louder to get heard.  If you pull down the offending frequencies you can turn the same signal to the Monitor Send to maybe 8 or so.  Happy vocalist.