Here is the 2nd installment of my live recording of Crash Landing back in 2002. I played with them for a number of years. First as a sound guy. I knew the singer Gary Jefferson and he pulled me into the group. Gary and I go back a few years. He knows everyone and has played all over town. I have helped him with outside projects and you can hear his vocals on a lot of my original songs. Great people are hard to come by, but they will be there for you when you need.
I wish I had more video to share. I have a call out to other band members and friends to send me copies of anything they have. I have created videos for years but never really did much during this time. Again, I wish I had. Here is the next section of an evening with Crash Landing. This is still the first set and we are getting warmed up. Settling into the sound. That is the toughest thing about one-night-gigs; everything sounds so strange for the first 3 or four songs at the minimum. Depending on the sound guy/gal, this could take up to an entire first set to get comfortable.
I don’t have records of who was running sound this night. With this band I USED to run sound from the audience, then became a band member and ran sound and played/sang from out in the crowd using our own equipment! In many ways that was very cool. After a while we hired sound companies and I just don’t know who was at the board.
I hope you enjoy a night out – to hear a live band – without leaving your home. It’s like you are at the show, but you can still have one more drink and not have to drive home!
Through the beginning to the end of the last chapter, we have concentrated on the hub or the central nervous system of a Live Sound Reinforcement assignment. I have been focusing a bit on live performance in a typical band or musical event. We now understand how most equipment for the House PA, the stage monitors, effects, and even lighting systems use the mixing board as the central hub. The mixing board’s usefulness does not end there! Once equipment is set up, connected, turned on and confirmed functional, most of the adjustments made for the rest of the evening will happen because of changes to the mixing board. It also becomes the Master Device, and all other connected devices are ultimately controlled by the mixer. The sound engineer is the ONLY person that should touch the mixing board.
The next logical step would be to describe the components of the House PA system and how much power (or how much money do I need to spend….). After all, this is what most people hear, right?
Obviously, I set up as a trap question. The answer seems obvious.
If I said, “I sound like a broken record”, most young readers will not know what that means! But I will repeat myself on certain themes and I feel one a’ comin’! The next important thing is not the House PA and the number of speakers and amplifiers you need. Most small venue mixing engineers go straight for the house and main systems, completely ignoring the most important ingredient guaranteeing a great performance. We will avoid that trap now and focus on the stage and more importantly – the musicians on the stage.
When bands practice, they ultimately find a good use of space and volume so each member can achieve the two primary goals;
1) Hear myself (usually louder than any one else. This is not ego and we will get into that later)
2) Hear the other performers (usually not as loud as the performer wants to hear him/her self!!)
Once they settle in and can accomplish the above – practice is comfortable and productive. Each member can hear themselves and can also hear enough of the other members to blend with them. If you saw a live symphony orchestra and all you could hear were the trombones, it would seem like an awful performance. If you were a musician in the orchestra and all you could hear were the trombones……………
Now we can go back to the band members standing on a stage or venue they have never seen or played in…… and now understand that this is a very real challenge, and the smaller the venue… the smaller the budget. Lack of Resources can be difficult challenge to overcome.
In larger venues it was quite normal to have a smaller mixing board off to the one side of the stage. All the instruments and monitors would connect to this mixer, and it would ‘split’ all channels and send them equally to the House mixing board out in the audience area. (it can also be used to send signals to a recording van parked outside). The sound engineer on stage makes the band members happy by concentrating on the performers but does not affect the signal going to the House board. That way the House Engineer has full control of the unaffected incoming channels from the stage board.
Good enough for now and in the next few sections I will focus on the stage sound and mix.
Think of the stage as a speaker sitting in front of the audience….. sometimes the club or venue actually looks like a box where the performers are positioned. You have the low-end Bass Guitar, Kick Drum and Floor Tom and maybe keyboard sounds or textures. You have the Guitar and Vocals in a mid-rangy area and at the upper end you have symbols and higher range Guitar and Keyboard sounds. All inside the same box just a blasting away at different levels and pointed in all directions.
Now you have a better understanding of the challenge of making these various chunks into a tasty audio stew!
For the best way to present music to the savvy listeners of today, we do what has been done for decades. In the stereo image, you want to create a “room” or “place” for the listener. We have become comfortable with the very low end sounds coming from both speakers at about the same volume. This places the sound to the center of the listener’s field.
We like the vocals or in most cases the melody line to be in both sides equally, again placing the singer in the middle of the left-right field. We are fine if other instruments or singers are more to the left or right as long as the main sounds are where we expect them. We usually place big speakers on either side of the stage facing the audience…… usually in front of the stage and performers…. But as mentioned above this is not a finely tuned speaker cabinet by any means. The components are not necessarily proportionally balanced in volume or location. Setting up the Stage and PA system with this in mind can help reinforce the natural stereo image out in the audience.
Now that I have made a connection that is awkward if not confusing, even though the PA system in all likely hood is a Mono mix coming from both sides or columns of speakers, the listener still hears this as a stereo field. They want the low-end sounds or tones from the center of the stage. Typically the drum – the Kick Drum to be specific for this example – is the most used and most amplified instrument in band situations or where you have audio media. The Bass Guitar player is usually next to the drummer. This helps them keep tighter timing and solid beat, but also supports the stereo image of the listener.
Guitar and other amplified instruments on stage can be heard more from their side of the stage than from the other as an easy example, even if the volume through each side of the Main is sent the same level signal. If keyboards are on the opposite side of the stage from the guitar and also uses a monitor or amp, standing closer to them in front row can make it seem like the keyboards are too loud and those on the other side of the stage think the guitars are somewhat overbearing. It won’t stop them from standing there though! As you get further away from the front of the stage or if the venue is very large, this stereo effect has less and less meaning to the listener. Still, as a rule, most sound systems do not place low-end PA cabinets (or dumps) on one side of the stage and the mid or hi-end cabinets on the other side. It can be however, advantageous to place the low-end dumps in the center of the stage or along the front-center stage area. To make this more inclusive, it is also more comfortable to hear low-end tones coming from an elevation point lower (on the floor, for example) and the higher tones or frequencies coming from higher points (mounted above the stage or on tall poles).
If the volume on stage becomes to strong a level it will negatively affect all the above and more. To reinforce another post of mine, musicians just need to worry about performing great – we sound geeks will make them sound good and loud! I keep dreaming.
This was one of those amazing events that happen in your life. You get thrown together with really cool and creative people and work on a project. There are so many stories here it is a good thing that I need to break it up into a number of segments. I have already credited a lot of the experiences I had as a result of working at the music stores. This was another one of those. The employees were musicians by definition and we also had band and instrument teachers working there. Everyone played but quite a number of us wrote our own material as well. At the store I managed, we were a diverse group with a wide definition of styles. I did not own it, but it was MY store. I had an agreement with the owner that he not visit my location while I was there. I would run it my way and do the best I can as if it is my store. He agreed and for years I did exactly that. I took care of the people that worked and shopped there. I gave people real advice and information. We developed long-term loyal customers. It was a great team and we had a common goal – do good and we keep the owner out of our building! Great motivation.
A local radio station WOXY in Oxford, OH sponsored a Local Licks radio segment I think every Thursday night for a few months. I had submitted a few of my songs and one of them got played one week. Nice feeling to hear your stuff on the radio. I submitted a few more original tunes and suggested one of the other employees to enter some of his songs. He had more of an urban beat box groove thing going and he did all his own recordings. He did not think anything would come of it as his stuff is even more eclectic than mine! So he gave me a cassette tape – yes, a cassette tape! – and told me to pick the best songs and send them in under his name. I took his tape home and consumed it for hours. Then I made my decision and picked three songs to submit. This is one of those funny things too. I sent in a song I thought had a great hook a nice arrangement and was really catchy in the genre he was in. I entered my next favorite that really pushed the drum/percussion thing he had going. I thought they had a good chance.
For the third song I threw in something that in all honesty was my attempt at ‘comedic relief’. I figured if I threw something out there that was really bizarre and off beat, they would think the other two songs were great by comparison. Not that the song was not great, but not a match for this heavy-leaning college radio station (… “the future of rock and roll” …..) The third song of his featured a banjo player and an off beat kind of groove. The Local Licks segments lead up to a radio version of battle of the bands. Songs played on Local Licks weekly segments would be entered into an elimination round on the last week the program aired. The finalists would have their songs played one more time as the winners were announced and then the bands would perform for just under an hour in a well known club in Cincinnati for prizes and glory.
As we listened to the local radio station during the elimination round there was a funny feel to the ‘winners’ moving ahead. There was an unusual flavor where songs you thought would be a shoe-in were dropped, and unusual tunes were advancing. Some songs were down right off the wall. There must have been a shift in judging but there were songs with unusual instruments in them getting to the finalists position. There was a song by a band called Tuba Blues. Another one I can’t remember had another unusual lead instrument and to think of it, as you remember one of my friend’s songs featured a banjo player!. Sure enough……. his song kept advancing. We were floored when they picked my friend’s third song! That night on the radio they announced the four finalists that would compete in a live battle of the bands event at Bogarts. Without pulling out records I think the event would be in about three or four weeks time from the announcement.
None of us at the store expected any of us to go that far, let alone to finalist. But none of us could believe that was the song that won! It was a fluke that I entered the song and that the judge apparently was looking for unusual instruments in rock and roll bands that year. Who da thunk? Once we met at work and talked it over it became obvious my friend had one problem; he was a soloist and there was no band! HA! The guitar teacher had a band called It. Ellen and I would join on keyboards and guitar and vocals and another employee and great friend over the years would join in on keys, guitar, vocals and a mean shaker! Each of us put in original songs to perform as a band and we rehearsed for a solid two weeks to try to get ready for this show. We knew numbers-wise we did not have a real chance of winning, but we were determined to make a show and event out of it.
……. All the while in the depths of a cave far from civilization, a Master of Ceremony was writing a series of short speeches that would be an added theatrical presentation between songs. Only the day of the performance did we see how this fit together and we had no idea what he was going to say – with the exception of a few word keys that would trigger a response from the band members, and occasionally the audience in return.
Fortunately we were all musicians currently involved in original songs and live performance. We had pretty good gear and we knew how to use it. We knew how to learn songs and how we can add to them or subtract as needed. Practice went well and started to be fun. The writer of the winning song chose the band name, and we made T-Shirts for all band members with the band name and studio logo; Willie the Ferret Studios. We worked out vocal parts as we had a number of vocalists and lots of harmonies and added speech. The lead guitar player was killer. His drummer was awesome and the bass player in their band IT, was solid and blindingly fast. With that foundation we just had to do our thing and it would all blend in fine. So we were ready enough but nervous as hell. A lot of things could go wrong here.
We get there and listen to the bands that were playing before us and there is a pretty good crowd at this point. We have our equipment squeezed up next to the stage entrance so we can rush in as soon as this band is done and moves their gear out. We set up fast. My keyboard controller does something funny and it takes me a while to fix it. No problem – tune guitar and ready to go. We look around and there are only a few microphones so we ask for more as we have a number of vocalists. They tell us no, that is what everyone gets. So as you see us a little unorganized and running from one side of the stage to another, it is changing instruments and trying to find a way for all vocalists to sing – or speak their part. After a while it was just funny and we worked it out quickly for the most part and had fun with it.
The audience is not sure and a little uncomfortable with the speeches at first, but after a couple times and solid music everyone got the idea and joined in. The band has to settle down a little and the monitors and the mix takes a while to get used to. It is hard to hear some of the keyboard and vocal parts in some parts but that is to be expected. The writer of our winning song does not perform until the last song, so he helps with the Main House mix in the club. We were a little more involved than the regular rock band so he was able to plan ahead. I wish the lighting guy had help too. They seem a little lost at times but over all still a cool event.
Most of the connectors used for outputs will be 1/4″ male jacks. These can be for ‘grounded’ (three-wire) or two-wire cables. To make this part confusing, the cables can be made or changed with adapters to almost any connector type. For long distances we prefer grounded or three conductor-wire cables as the third wire is used to take common signals from the other two wires, and ‘dump them to ground’. Common signals would be interference and noise as the plus and negative wires are carrying the signal from the board. The result is good signal with low noise introduced. Guitar and keyboard cables typically go shorter distances and typically have a higher or stronger output signal than a microphone for example. The cables in the snake will use three wire grounded shielded cables even if they are 1/4″ male connectors.
So we might expect to have an XLR connector for the Main Outs to the Main House power amps, but this is not a guarantee. If 1/4″ jacks are provided it is recommended to use grounded three wire cables.
Most cables will provide a male connector on one end and a similar but female connector on the other end. Male connectors are often used to connect to In-Puts and Female connectors are often used to connect to the Out-Put. The male connector of the microphone cable connects to the mixing board In-Put and on the other end the female connector will connect to the microphone out. Generally speaking there is little advantage plugging an in to an in or an out to another out. I like to state the obvious LOL!
The mixing board will give us a Main Left and Right out, and probably a Mono Main Out. These will be connected to the Main or House power amps. During an event, the amps are usually turned all the way up and the House volume is ultimately controlled by the Main L-R faders on the mixing board. This is why it is important to turn the Master Volume Faders on the mixing board all the way down whenever connecting or disconnecting equipment or making dramatic changes.
Depending on the board size and configuration you may also have a 1/4″ Direct-Out for many if not all input channels. (this is REALLY cool for recording and a lot of other creative uses…) These can be really handy for independent channel recording, triggers, audio effects and alternate mixes to name a few. Basically connect these to external recorder, processor or triggering gear as needed. I will give some examples as the series expands to other main topics. You will also have a number of Sends that are used for a variety of tasks and have different names, but with a few configuration details are for the most part the same thing. Effect Sends, Monitor Sends, Auxiliary Sends, Sub Sends are splitters; they split the signal – keeping the one going to the House or recorder – and allowing you to send a lot or a little of that signal to the Send of your choice using the Send knob. As in the Monitor amps and House amps, the volume knob will ultimately be used to send the proper signal level to the external (and internal) devices or effects. If you ‘send’ this to a digital delay, it may also have its own input and out put level knobs.
You may also have a two-track input and/or out put. This is for playing stereo audio devices and for a straight stereo record out option. Handy to listen to practice tapes, intermission music, PA system tests and other performance related media.
I want to give you an idea of perspective on some of the articles I have posted and will continue to post going forward. This is the first video I have posted and while it is rather BORING, it is so informative at the same time. I guess I have recorded original tunes since the very late 1960’s. I recorded everything. I deleted a lot! But I recorded everything I could. I experimented and adjusted and re-did and failed a few more times than I succeeded in the early days to be sure! I also got into photography and then into video recording. I practiced the mundane over and over until I got the exposure right, then with video until I could zoom and focus manually. I joined the photography club in high school and learned to develop and enlarge my own pictures – something I thought was close to magic back in the day!
I shared earlier that I used (and still own!!!) what I think was the first personal computer to come out with built in MIDI ports – The Atari ST! I used a software program back then to record the MIDI tracks and I could generate SMPTE time code and send a signal from the Atari to sync it up with recording machines (I had the Yamaha 4 track CASSETTE recorder during most of this). When I talk about old technologies and how we used to record songs (or develop pictures…) It is hard for some to understand the challenges we had and the lo-fi quality of the final mix or product.
I want to use this video as an example of many things I refer to in this blog. In this video, you will see what I saw when looking at the Atari computer monitor when I was playing or recording tracks. Keep in mind this is all MIDI equipment available years ago. The song I posted earlier will now be stripped of all guitars, vocals, effects and additional live sounds you heard on the full mix. As you watch the video you will hear the sequences being played back live into the VCR input. I took the monitor video out and connected to video in of the video recorder so this is a straight feed for both. In the recording software, each “instrument” has a separate track. Drums are all on one track with additional percussion sounds on different tracks, and as a reminder, each note (as triggered from my DX7 keyboard) represented a different drum/percussion sound coming from a drum machine. You can hear the metronome from the Atari ticking away in the back ground as it is set to record. As each track plays you can see the musical notes light up depending on the intensity of the track information. You can also see the tempo of the song, the names of the tracks and the measures and beats as they click by.
The main piano sound is probably familiar to many of you even if you are quite young. It is the classic Piano Tine sound from the Yamaha DX7 synthesizers. This video should also give you a sense of quality and resolution available at the time. It might be difficult to hear the difference in song recording quality today, but we are all familiar with video resolution and HD cameras and large screen TV and computer standards available now. Just think how this applied to the audio quality back then and then play some really old songs you grew up listening to. It gives a better appreciation and perspective for some of the classic songs that seem to live forever.
For me, sequencing is fun and very versatile. I am not the kind of keyboard player that can jump in on any song and just start jamming. I do better if I can take my time and learn, practice, and improve before practicing with a full band. A lot of this might be from the lack of confidence in the early days, but in reality I find myself a jack of all trades and master of none. If I had spent more time on any one instrument, I might have gotten pretty good. Fortunately – or unfortunately, I have always been interested in so many different things that my chops were not the best. As a percussionist, I was able to hear what I wanted, but did not play drum kits so my feet and hands were always locked in perfect step! Sequencing gave me the ability to lay down rough performances on the keyboard (and remember I use the keyboard keys to ‘trigger’ the drum sounds, so I am still playing keys). Once recorded using MIDI – again I am not recording the sounds but the physical action and movements, I could enter the Edit Mode on the sequencer and make corrections to timing, notes, durations etc. until the piece felt good to me. For the drums, the standard practice is to use the Quantizing feature (I can go into this later as well for future posts) to make sure all beats were perfectly ‘on the grid’. I have used drum machines and sequencers since they first came out. The sounds are great but too often the result of overusing the quantize feature makes the drum tracks sound mechanical – unmoving – and even impossible for a real drummer. I preferred to leave a little slop here and there. I want emotion in my songs, not perfection.
In “Bassics”, I just enjoyed the new sounds I had and played with this Bass Guitar patch and came up with the basic groove. I like adding textures and unusual percussion/FX sounds to keep the songs flowing and changing. Available sounds are so much better now, but I still enjoy bringing out these old tunes.
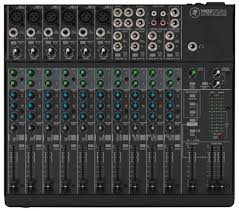
The sound board or audio mixer represents the hub in most audio mixing and mastering functions. everything connects to the board. Even the lighting system will use channels in the snake to connect from stage to console. Things get plugged into and things get plugged out of the mixer as needed. Today’s mixers are blue tooth USB WiFi fire-wired and light-piped together and will connect to an amazing array of devices. So far we have focused on what gets plugged to the Inputs of the sound board. There are a number of connection possibilities for the Outputs as well. We have already discussed some of them earlier, so this can be brief as you already know a lot of this in general.
On most sound boards you have a number of analog-out options. In earlier discussions we talked about XLR and 1/4″ cables and connectors. These will continue to be the main ones used for outputs. On the front or face of most mixing boards you will see a stereo headphone out. It will usually have its own volume knob and probably a selector to pick the options to Monitor including Stereo Out, Solo, Effects Sends, Effects Returns, Sub or Groups, Auxiliary Returns, and other options. On the back or the top of the mixing board you will see the panel for Out-put connections in different sections. There are some rules to determine what type of Audio Cable is used and whether it is a male end or female end and whether it has two connectors or three (or more).
In the early days of mixing boards, microphones and keyboards, it was important which brand you purchased. If you wanted to get ‘that sound’ you had to have this mixing board channel strip or that particular keyboard. Later on the computer industry similarly shot through their early days and you had the Macintosh or the Windows PC. If you were brought up with one you could not be talked into the other. Most modern equipment from PC’s to Automobiles can do everything. They all have similar platforms and emulators. There is style and quality as there always will be, but you can get software mixing programs and microphone/guitar emulator plugins that will make your audio tracks sound like anything you want —-THEY CAN EVEN MAKE YOU SOUND LIKE YOU ARE SINGING IN TUNE!!
So if you like Pepsi, no problem. Want Coke? Press this button…… More comfortable using a Mac? Go for it.
All it takes is cash, a thorough understanding of what all the terms mean and a good idea where all the buttons are?!!?
I am famous for doing things the easy way and if I can, as cheap as possible. Now that does not mean forget quality and versatility. It means I won’t spend money on gadgets that I don’t need. I try to run as clean a mix as possible, and making sure everyone gets heard. If they are up there ‘playin it‘, I want the audience to hear it. In reality, it doesn’t take a lot of gadgets to accomplish those two major things; make it sound good and loud enough for the venue, and put all instruments/vocals/strings/spoons or tambourines, I don’t care what it is…. in the mix. As a band member, hiring sound guys and their rigs, a number of times after sound check and a few songs of the first set, my microphone was turned down so low, no one could hear me even in-between songs. I could not get the sound man’s attention, or anyone else’s for that matter because no one could hear me (and as a keyboard player I was usually in the back corner of the stage in the shadows Ha!). So eventually I just adjusted the microphone stand down toward the floor in front of me. It is easy to hit the wrong button or turn the wrong knob; happens all the time.
Remember that the sound guy cannot hear what is really happening up on stage. Sometimes you THINK you can. But you as the sound engineer should be the first person to know what is going wrong when it does. Keep an eye on all performers – they will look to you first. As a performer and studio guy, I could tell when the guitar player broke a string, or if the drum head split and when or if the drummer had too much to drink on his birthday gig. Things will go wrong but a lot of the time it is the sound guy. You make an adjustment and grab the wrong knob. They all look alike in the dark part of the venue or room. The consequences can be anything from a non-event to a full blown crisis, depending on which knob you grab. Obviously for the extreme crisis, you will know right away what happened and will probably be able to correct quickly.
It is the slow creepy ones that will get you. Two songs later something changes on stage and chaos begins.
I suggested we set up the mixing board so the FX Returns are plugged into open channels so you can control their volume with the faders rather than the FX Return knobs. I always turn the effects down in-between songs. (you also get EQ and other benefits) This makes it SOOO much easier to see in the dark clubs. I also use the sub-groups to assign drums, vocals, and other groups of mics their own fader that feeds directly to the Main Out or house out. If there is a problem with one group, you can quickly test by adjusting that sub-group fader and see if problem goes away. If not, return it to where it was and go to the next sub-group. This way you do not have to go through fader after fader searching for a bad signal or feedback loop. Once you narrow down the offending group, you will have a much better idea what the source is!
I would say most live performances the sound board is mixed to a Mono output. In smaller rooms or clubs, I loved running in stereo. I mixed for keyboard progressive bands a lot and the stereo keyboards and samplers consumed the rooms when mixed right. Not in volume——– The vocals (sometimes three sometimes five in the band) panned as well. Overkill in a way, but not much work and easy to arrange with equipment versatility. Most boards have stereo FX that can add lot to the imaging. But again, that is not the norm. So you can either set board up in stereo and have the Main Output plugged into the MONO OUT to your system, or you can mix to mono and use one Main fader or the other. That’s about it. We have covered the entire mixing board, in its basic format. Headphone outs, Tape or other inputs, on-board effects, Solo or Audition functions as well as digital features make new sections.
As we continue down the signal path, we get to a new section. This is separated from the EQ section and generally uses a different color coding for the associated knobs. The next group is the Aux Sends. Each send represents an output jack that will go to external audio sources. One example would be the stage monitor mix(s). If you have two monitors on each end of the stage serving performers, you can use Aux Send 1 going to the left monitor and use Aux Send 2 going to the right monitor. If performer 1 wants to hear themselves and a little bit of performer 2 in the same monitor, simply send a lot of performer 1’s channel to Aux Send 1 and a little of the performer 2 to the Aux Send 1. If performer 2 does not want to hear performer 1 in their respective monitor, simply turn up performer 2’s channel Aux Send 2 up a bunch and do not turn up Aux Send 2 on the channel for performer 1. That was probably harder to say correctly than actually doing it.
You can use Auxiliary Sends to route a signal from any channel to external effects boxes like Digital Delays, Reverbs, and even recording devices in a pinch. You can use it to trigger light boards that have an Audio Input mode.
These Auxiliary Sends can sometimes be switched from Pre to Post. Some are fixed either way. This can also get confusing but if the channel Aux Send is in Pre mode it means Pre-Fader. The volume faders on each channel will affect the level of the signal that is sent to the House or the Main Out of the mixer and when selected, to the headphone out. It is a good idea to solo instruments in the headphones to pick or change microphone locations and isolate room noise and other performers. If the Aux is set to Pre-Fader, it means that the Aux Send levels will be determined before the channel fader has any effect. Turn the channel volume fader all the way down and you will still have plenty of signal going to the Aux Send. If the Aux Send is in Post Fader mode, the amount of signal sent to the Aux Send for that channel will be directly affected by the level of the channel volume fader. Fader off = no Aux Send level. The number of sends will vary widely. In this case, more is better!
At this point the example starts a new section. This will affect the Main Out section. This is where we can set the stereo Pan position, Mute or un-Mute the channel, and Solo the instrument for gain staging and troubleshooting during a performance. When running in stereo, general rule is very low frequencies get panned to center. After that, adjust to performance and venue. Sometimes the stage sound is very loud, and listeners close to the stage will only be able to hear that performer. Sometimes the shape of the stage or design of venue will require creative solutions using stereo panning.
This strip includes a pair of colored LED’s for signal strength and Peak warning level indicators. Occasional red for short periods of time are OK, but better to avoid as long as you have a strong signal otherwise. After we have set the various knobs correctly and have good signal strength, we can use the channel volume fader to set the level of that channel in the House mix. Channel Mutes can have different affects. Some boards Muting a channel will stop that audio source from all outs, and some might allow Aux Send 1 & 2 for monitors. See manuals for lots of details I cannot cover in these articles.
Other examples below with different lay-outs;
But here is the good news; we have just learned 75% of the face of the mixing board. Each channel duplicates what we just went over. All those knobs are now grouped logically, easily identified explained and we understand what each one is for. Here on in it is repetition for gain staging and sound check. Use Pad and 1st Gain Stage to adjust signal strength, add or subtract frequencies using the channel EQ, set amount of Aux Send to monitors and effects and set the stereo field positions as we watch level indicators and set channel volume fader. Repeat. Finished!
Next we can go over the benefits of Group Sends and the other 20%
")