Posts Tagged ‘#mixingboard’

As we continue down the signal path, we get to a new section.  This is separated from the EQ section and generally uses a different color coding for the associated knobs.  The next group is the Aux Sends.  Each send represents an output jack that will go to external audio sources. One example would be the stage monitor mix(s).  If you have two monitors on each end of the stage serving performers, you can use Aux Send 1 going to the left monitor and use Aux Send 2 going to the right monitor.  If performer 1 wants to hear themselves and a little bit of performer 2 in the same monitor, simply send a lot of performer 1’s channel to Aux Send 1 and a little of the performer 2 to the Aux Send 1.  If performer 2 does not want to hear performer 1 in their respective monitor, simply turn up performer 2’s channel Aux Send 2 up a bunch and do not turn up Aux Send 2 on the channel for performer 1.  That was probably harder to say correctly than actually doing it.

Three

You can use Auxiliary Sends to route a signal from any channel to external effects boxes like Digital Delays, Reverbs, and even recording devices in a pinch.  You can use it to trigger light boards that have an Audio Input mode.

These Auxiliary Sends can sometimes be switched from Pre to Post.  Some are fixed either way.  This can also get confusing but if the channel Aux Send is in Pre mode it means Pre-Fader.   The volume faders on each channel will affect the level of the signal that is sent to the House or the Main Out of the mixer and when selected, to the headphone out.  It is a good idea to solo instruments in the headphones to pick or change microphone locations and isolate room noise and other performers.  If the Aux is set to Pre-Fader, it means that the Aux Send levels will be determined before the channel fader has any effect.  Turn the channel volume fader all the way down and you will still have plenty of signal going to the Aux Send.   If the Aux Send is in Post Fader mode, the amount of signal sent to the Aux Send for that channel will be directly affected by the level of the channel volume fader.  Fader off = no Aux Send level.  The number of sends will vary widely.  In this case, more is better!

At this point the example starts a new section.  This will affect the Main Out section.  This is where we can set the stereo Pan position, Mute or un-Mute the channel, and Solo the instrument for gain staging and troubleshooting during a performance.  When running in stereo, general rule is very low frequencies get panned to center.  After that, adjust to performance and venue.  Sometimes the stage sound is very loud, and listeners close to the stage will only be able to hear that performer.  Sometimes the shape of the stage or design of venue will require creative solutions using stereo panning.

This strip includes a pair of colored LED’s for signal strength and Peak warning level indicators.  Occasional red for short periods of time are OK, but better to avoid as long as you have a strong signal otherwise.  After we have set the various knobs correctly and have good signal strength, we can use the channel volume fader to set the level of that channel in the House mix.   Channel Mutes can have different affects.  Some boards Muting a channel will stop that audio source from all outs, and some might allow Aux Send 1 & 2 for monitors.  See manuals for lots of details I cannot cover in these articles.

Other examples below with different lay-outs;

TwoOne

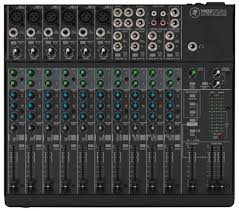
But here is the good news;  we have just learned 75% of the face of the mixing board.  Each channel duplicates what we just went over.  All those knobs are now grouped logically, easily identified explained and we understand what each one is for.  Here on in it is repetition for gain staging and sound check.  Use Pad and 1st Gain Stage to adjust signal strength, add or subtract frequencies using the channel EQ, set amount of Aux Send to monitors and effects and set the stereo field positions as we watch level indicators and set channel volume fader.  Repeat.  Finished!

Next we can go over the benefits of Group Sends and the other 20%

We all try to rationalize situations we are not sure of.   We attempt to explain why things happen – or things that happen to us.  We try to understand the world around us.  When I worked at the instrument music store, I rationalized that I got the job because I was a previous customer and that I could program and understand the new digital MIDI keyboards hitting the market.  Very quickly (months, I believe) I was given my own satellite store to manage.  I opened three more chain stores in a few short years.  In reality, I probably bought more in equipment than I got paid to work there!  Almost kidding, but I understood a lot of the toys and had played with a bunch of them, but to get a room full of toys all day long and then get paid to learn all I could about them, well, I won’t get into religion here but that was heaven on Earth.  I would have done it for free.  And do you know how I rationalized being a SALES MAN? (I am pretty anti-establishment from way back………..) I tried to listen to where the customer was coming from and what they needed.  From there I would teach them what I knew about gear that would help get them to the next level.   Everyone needs to get to the next level.  That is what I am doing today.  It is what you are doing right now.

And sometimes we need to explain to ourselves why.   Why do I need to buy that new toy?  Why do they like me?  Why does the sun always shine where I am?  Why aren’t things working as I planned.  Why don’t they understand me?   What did I do right or wrong?  This has bugged me all my life and I hope it does not get to you.  Working in the music store(s) I sold gear to a lot of bands. Some people were regulars.  Always something needed, some new gear.  One of the bands told me that their sound man was on vacation and they needed someone to run sound for them.  It SEEEEEEMED logical to ask me, I knew about the mixing boards and PA systems.  But I had never run sound before ( truth in advertising alert – – – I did run sound for one other band prior to this but that is a funny story I wanted to share with you later.  So I did it once before  ….. technically  …….) What would you do?  These are good customers and by now good friends too.  If I run sound and really suck, the friendship and the work relationships are out the window.  I let them know I do not have a lot of experience but if they don’t have anyone else I would be glad to help.  They decide to go with me for the vacation gigs.  I run through the checklist a thousand times in my head.  I set the stage and house equipment up methodically, I run through the gain staging like riding a bike, I get the monitors working and run CD audio through the mains to test them.  Time to start.   Big crowd.   Lots of people and friends.  As you can imagine I am rapidly cycling through excitement, concern, confusion, fear, panic, and jazzed up one after the other.  The band starts playing and they are soooooo good I just relax.  I think even I can make these guys sound good!  I was lucky.  From what I remember the event was fine.

Their sound man decided to move onto other things and when he came back from vacation I was asked to take his place.  Again I had to rationalize;  well, they only like me cause I can get them a deal at the store. Well, they like me because I can set up the equipment pretty fast.   Well, it went over well because they are really tight and have great equipment.   You have probably done that a bunch of times as well.  It was hard for me to accept all the way down to the point of knowing that they noticed and appreciated the mix.  Their fans did too but most importantly, so did the band wives!  Never forget the power of the spouse!  So now for the first time, I am involved with a real band.  I am the regular sound guy.  The Band understands the power of the PA, and they determine that the sound guy gets equal cut…… as if he is as important to the overall sound as the individual band members were.  Amazing concept and it worked so well over the years.  I could not rationalize my way out of deserving that one; we worked as a team and the band always sounded great.

All this from knowing how to program a digital keyboard.

Again, there are lots of guidelines about setting EQ.  But don’t let this confuse you early on.  Basically, this is a fancy way to change the tone of the signal.  Knobs that are tied together in brackets work together. One determines the frequency range that will be affected and the other knob determines how much boost or cut will be applied to the selected frequency range.  The first instinct is to turn everything up.  Indeed this is quite natural but wrong.  Test after test, many people will say one sound is better than the other even though the only real difference is the higher or louder volume level.  If you think of boosting the frequency group with the EQ as if it were an amplifier turning the frequency group louder, this will help explain why we needed the extra head room when setting up the gain stage – you are making the signal louder when you add EQ boost.  If everything is set and you boost a channel EQ, you can unintentionally overload the input level on the EX send for example, causing that signal to distort or clip when returning back to the mix.

In this configuration there is a hi frequency group cut/boost knob.  Then there are hi-mid frequency knob tied to a cut/boost knob and below another pair in the Low-mid frequency range.  Underneath that is the low end group cut/boost knob.  In essence, select the amount of cut or boost on the frequency groups (Hi – Lo) to shape sound so it reflects the source signal.

For the paired knobs, select the frequency to be affected and using its pair cut or boost that particular frequency (as opposed to a larger group of frequencies for the Hi-LO knobs).  Keeping in mind sometimes less is really more, rather than try to turn frequencies up or louder to make them sound better, try making them sound bad.  Which frequencies interfere with the shape and tone of the instrument?  Does a certain frequency make a nasty squawking sound when it is a bit louder?  Try cutting that frequency a good amount.  You might be able to turn the channel volume up after cutting signals and keep the level not necessarily louder over-all in the mix but in the correct group or place in the instrument/vocal mix.  Listeners will be able to hear the instrument clearer and more distinctly if it closely resembles the real instrument’s group. So this gets pretty easy.  Like a simple home stereo, turn the top know to clockwise to make the sound brighter by increasing the hi frequency group.   Turn it counter-clockwise if it sounds harsh or brittle in the upper range.  The paired knobs allow you to select specific frequencies within a group (Hi or Mid) and then cut or boost to shape the tone of the source and add flavor or reduce gremlins.

For microphones that will be used by vocalists, this is an area where you can make a lot of difference because the vocalist signal is also being sent to the on-stage monitors.  Sometimes they are really loud.  And when that happens, the monitor is blaring the vocalist’s signal right back into the microphone on stage.  This in turn goes quickly to the monitor and straight at the microphone again.  Soon this will turn into a squeal in the range that is strongest or loudest.  This is the classic example of a ‘feed-back loop‘.

The knee-jerk reaction is to turn the channel volume down or turn the monitor sends down.  The better way is to learn which frequency/frequency group is triggering the loop first.  Use the paired EQ knobs to change the hi-mid or lo-mid frequency responsible for triggering the nasty loop.  Successfully done, slowly turn the volume up a bit.  Slowly increase volume (usually to the monitors, but will apply to the House Mains in some situations) until you start to hear a feed-back loop starting.  Determine which frequency it is and turn it down in the mix. You want as much clear gain as you can to the performers. If you can only turn Monitor Send up to 5, let’s say or you get feedback, the performer might not be able to hear themselves over the amplified instruments and will be forced to scream louder and louder to get heard.  If you pull down the offending frequencies you can turn the same signal to the Monitor Send to maybe 8 or so.  Happy vocalist.

Now that we are back to audio channels, see the examples below.  Remember, that the channels run down from the TOP.  In some mixing boards, there is a ‘pad‘ switch – it could be above or below the 1st gain knob – that can determine which input type will be monitored by that channel and it can also change the input level or signal strength.  To reinforce the general definition below, if the audio source uses a battery or gets plugged into AC, it will need to be ‘padded‘ using this switch, where MOST microphone applications will not be strong enough if the channel is padded.

Whatever is plugged into the input jack on the mixer for that channel will send a signal to the 1st ‘gain stage‘.

This acts more like a flood gate than an amplifier in that it allows you to reduce the strength of the signal coming into that channel.  But it feels like an amplifier as when you turn it clock wise – it gets louder and if you turn it counter-clockwise – it gets softer or lower in volume……  This is the great balancer.  This knob determines how much of the signal gets distributed or sent to other out puts, effects, processors and recording devices, etc.  This is the foundation of the mix you are creating.   We start here and do not continue with the other knobs and gizmos in the ‘channel strip‘ until this is set correctly.

The biggest trick in setting this up for most band performances is – well – band members.  A lot of them do not trust the sound guys they have worked with for a lot of reasons.  Some performers will set their level (amp, energy, settings) really low during sound check, knowing once the sound is going they can turn themselves up so they can hear themselves.  Most often, it is just difficult to play really hard and loud like you will during a full band live performance when no one else is making noise.  Knowing all that, you need to start with a good level here so you can set the gain stage properly.  Generally, open microphones will need more gain than instruments like keyboards or mp3 players.  Things that get plugged into AC or use a battery will probably have a stronger signal strength than those that go directly to the snake/mixing board.

As a caution again, make sure the amplifiers are turned all the way down before you plug anything into the mixer once the full system is connected.  We tested the House PA and Stage monitors before the band got here, so before you start plugging in instruments and performers, turn the House PA amplifiers down.  I also turn the Monitor Sends down all the way so you do not hit the monitors with some pretty ugly sounds.  If you use fantom power for your microphones or other devices, I have heard people suggest you do the same whenever turning this function ON or OFF.

Now we are ready to move through the rest of the channel.  I am old school, and I like to start with the mixing board ‘clean’.  With all knobs and gizmos set to center or neutral.  Some guys like to start off where they left or pre-mix, but I have seen many situations where that theory gets yanked.

Above board design has the +48 fantom power switch.  When pressed in it will send appropriate voltage to the microphone or device.  Best to have Master faders turned down during this part as well.  Underneath is the pad/Line switch.  This you can safely determine a good guess in advance depending on what type of instrument is plugged into that channel.  You can always start with pad pressed in and gain stage at minimum to be on the cautious side and then release pad and turn gain knob as you watch the signal LED’s.  Get good performing signal as opposed to good practice level and see where the gain stage knob is pointing.  Try to get signal meters and LED’s close to the red or overload stage, and then back off the gain stage knob just a little.  We may need the extra head room when we add EQ, use ‘inserts‘ etc.

This board and many others offer a HPF (‘High Pass Filter‘).  When depressed it will allow mid and high frequencies to go through the channel and process normally.   So, it really cuts or turns down the really low end signals.  This is where the frequencies and ranges of instruments in an earlier LSR series come into play.  Instruments like, flutes, acoustic guitars, vocalists, cymbals, snares cannot make sounds in the low end.  The over-all mix will benefit if you use the HPF and cut the very low frequencies on those instruments.   Microphone stand rumble, bleed over from the kick drum into the snare along with a number of other unwanted sounds can be eliminated before they even get into the mix.

Next series we will continue down the signal path.

This probably won’t be the last time I will mention that I like to teach things that I have learned over the years.  But I also like to learn.  I did OK in school, but nothing really interested me, so I just made it through.  At the right time in my life, I found music.  From my parents, TV, brothers and back then AM radio, I absorbed all the songs I could.  Back then they did not pre-package and filter music in the same way they do now,  You could hear unique styles and among the commercial sounding and cookie-cutter pop tunes there were really talented songwriters and performers.  Recordings were also hit and miss, with wide varieties of textures.  We were still waiting for “stereo” to come out.   Fun times!

I bring part of this up to say the following:  I am just a guy.  I have no formal training, I haven’t gone to technical schools,

I have not worked with national major players and unless you hang out in my town, you probably do not know the names of the bands, writers and performers I have been blessed to know.   I wish you did.

I also know a lot of very smart guys that have all the answers and references ……

Then there is the group that THINK they have all the answers but never get things to work or things sound bad and get worse as the evening goes on.

The best way in my opinion to truly know what you have learned is to teach it to someone else.  (if you can!)

I do not think another series about which knob you should turn, which special new box you should buy, which new instrument will get you to the next level, or which processor do you add to a particular instrument is going to add to what is already out there.  I would like to give you a feel of options and let you figure out on your own why ‘it doesn’t work’ or if ‘it sounds bad and gets worse’.  As described in earlier my LSR series, a number of live sound tragedies could be avoided if the sound engineer understood the challenge from both points of view.  Too many sound men and women mix to the House.  It is extremely important to mix for the Stage as much as the House.  More on that later.

Once you know why it is not working or not sounding as good as you want, you will be able to fix or improve the mix much quicker.  There are tricks that will help there as well.  I picked up a few from here and there, started writing songs with my older brother, bought a 4 track reel-to-reel and a couple Radio Shack microphones (that were great and I still have one in my mic case!!).  After that of course we needed guitars, drums, organ, and I am still living at home.  I had to figure out how to get them all to work together because back then I was the ONLY person I knew that had anything like recording equipment.  Necessity is the Mother of Invention and I kept going until I figured it out.  Once friends and their friends knew I could figure their stuff out, I got to know a lot of musicians.  Then I got into sales.  One thing leads to another.

Setting up the sound gear for a live gig, the beginning part before you even plug in the equipment, creates the foundation you will need to have a problem free event.  IF we understand what the foundation is there to do, the building or pyramid can get as tall as you want, and you will not have to worry about it crashing down on everyone around you.   Here is where we need to focus or channel in on the foundation itself and the ways to build a strong audio reinforcement base.  This is why I truly believe if I can learn it, so can you.  Next series we will talk about the other type of audio channel.

http://www.cdbaby.com/cd/perigee

**This is MidiMike’s daughter. I help my dad out with his blog. I wanted to tell all of you that this is, by far, my favorite song that my dad has ever written. If you stop to listen to any of the original tunes, I would highly recommend this one!! Thanks.**

And now a message from my dad:

On most of my tunes, I play all the instruments and sequence the drums and other sound effects.  I usually sing lead or I have my wife take the vocal lead.  Once I started working in music stores selling instruments and sound equipment, I asked friends (and customers at the time!) to come over and lay down guitar solos or I might have a guest vocalist.  What I do at Night was one that we did ourselves.  I play all guitar parts and the back up vocals.  I think at this time I had graduated from a Yamaha MT4X (I think they were called and this was a 4 Track double speed cassette recorder) to the Alesis ADAT.  So now I had an amazing 8 tracks to record on!  Actually I needed one track to record the SMPTE time code so the Alesis ADAT would sync up to the computer (now I actually have a PC and put the Atari in deep storage).  I can go into this details on this system for a later post when I am feeling nostalgic, but it allowed unlimited MIDI tracks on the PC or Atari and connect to the playback of the ADAT.

The song itself reflects my thoughts on a number of topics.  I really like to drive.  I don’t have a fast or luxury car.    I just like to drive.  When I have some free time or just want to think, I often find myself cruising the local  country side.  I would listen to music while driving and that sometimes adds to the frustration.  Most of the music you hear on commercial radio is garbage or re-packaged songs and ideas I have heard for the last few decades.  Like a lot of us struggling artists and performers, we see a bunch of bands with lots of air-play and they are just so-so.  OK music, but nothing special.  As a songwriter, I get so tired of the same theme or idea in every song on the radio and they seem to get played non-stop.

One line reflects this fairly well…. ” so I turn the radio over to the right, playing the same songs as the other night”.   Originally titled – “Rainy Day”, What I do at Night has become one of my favorite driving songs.  Enjoy.

When you start off with well-balanced levels on all inputs, you can make changes in confidence.  During sound check; which is AFTER Gain Staging and setting up the board for the current event, you added each band member and their related instruments to the process and you have good levels on all tracks/channels.  I try to grab a few minutes once all drum inputs (including drummer vocal pic or other percussion and tone generators) are set properly to have the drummer play for a few minutes without other musicians.  This helps get the feel of the entire drum kit and this is when you would balance all the levels.  The hi-hat for example, might not be hitting the meters in the upper range but it sounds really loud if its fader is up to the nominal level.  It is helpful to know once the board is set you can turn the volume on any track DOWN any time you want.  You just do not want to turn anything up beyond the sweet spot except for the occasional solo or special piece that might need additional reinforcement or boost out in the audience.  And as always, try to return to the sweet spot area once the section is over.

Some mixing consoles allow you to assign tracks to separate signal paths or additional outs.  These can be grouped to a single sub fader when running system in mono.  You can then take the individual drum tracks out of the house mix and send them only to the bus for your drum kit.  Assign this bus 1 for example to the Mains and the fader now for bus 1 will allow you to adjust the volume level of the entire drum kit (not the drummer’s mic if he or she also sings) with one fader!  If you need to change the volume of the kit as the event goes on, you can keep the blend and balance of all levels by using the bus 1 fader.  This might come in handy more than you might think, and it is easy to set up.

Then I do the same thing with the vocals if you have more than two vocalists on stage.  They can also be grouped to bus 2 for example and you can adjust vocals with one fader and not worry about changing the balance of the singers/vocalists on stage.  Brass and string sections and even a number of guests sitting at a table can also be grouped the same way.  You can still change the EQ setting for each channel in a group or bus and you can still change effects levels anytime you want without affecting the balance. 

Now if you think about it, we have grouped similar instruments together, set them up to control group volume with a single fader and we have the tracks and effects returns that might need minor adjustments during the event isolated and easy to see or adjust.  Your job now consists of only a few faders out of all the channels plugged into the mixer.  You are now in auto-pilot. Do not change anything major unless the performance or venue dictates a change.  From here you coast and make things better with ever smaller adjustments.  Time to add the glitter.

For most situations the process above will set you up in a comfortable area where things can all be heard at balanced levels, not too loud and instruments do not compete for the same frequency space.  For this step it is better to think  of sound from low frequencies on the left and higher frequencies on the right.  In many ways like a piano;  lower notes are on the left and increasingly higher notes as we go to the right keys.  Have your drummer hit one of the cymbals really hard with no other noise and see if it produces tones or frequencies like the lowest key on a piano.  It cannot.  It is in a much higher range.  Have the drummer punch the kick drum a few times and see if it makes frequencies as hi as the cymbals just did.  This is a simple explanation that gets applied to all instruments and vocals being blended into a smooth mix.   When using EQ, you can shift the range of frequencies for each sound so it does not compete or collide with other sounds in similar frequency ranges.  Often vocals and guitars are in neighboring groups.  Try using EQ to edge one signal a litter higher in the frequency group and the other a little lower.  So they still sound good and accurate like they are on stage, but just enough so the listener can more easily hear the two sources as individual elements in a wider landscape.  Similar situation with kick drums and the bass guitar.  Both occupy the very low end of our hearing spectrum.  If they are both deep in the low end, they might not be discernable as two performances.  You can try lowering the low end EQ a little on the bass guitar for example, but add some hi-mids and or a little hi end frequencies so the strings pop in the mix a little when struck.  It will still support the low end for that punch, but you will be able to hear the individual bass notes better without a lot of added low-end volume that can cloud or muddy up the low end.

Plain and simple, the lyrics are about my daughter.  As a proud parent, I am often overwhelmed by  the innocence, beauty and unlimited potential when holding a new-born in your arms.  Not to get weird here, but there is nothing like it.  As I cradle, rock or talk baby-talk, it is difficult not to think about the new life I am holding, how fascinating they are and to drift into thoughts of what will happen in their future and how we can make that path easier.  This song also features Gary Jefferson on vocals.  You will hear him a lot on my tunes, and he was the vocalist in the demo recording the band did in the studio.  He has pulled me into a number of projects and I often ask him to help me with mine.  There are so many musicians I depend on and work with regularly.  I will introduce you to them and the work they have done in future posts.

Most of the music is sequenced along with the drum tracks, I play the rhythm guitar parts and had a friend come in for the guitar solo, while my wife adds back-up vocals.  All grown up and with children of her own, the meaning of this song gets deeper and closer to the heart every year.

“Slick as A Dream” (c) MSK 1988

Slick as a dream, this beauty machine

Sharp and so cold, young – just as old.

Moving so sweet you can feel the heat

Smiles of sorrow can’t wait ‘til tomorrow.

One thing you’ve learned: love has to be earned

Pain must be shared, embraced if you dare.

Nightmares are gone, but she carries on

Can’t forget her, love lasts forever.

Tender love cries slowly hypnotize

The helpless day now melting away.

And if you dare she’ll become aware

Give those who bleed whatever they need.

She knows exactly who she is.

And exactly what she needs.

 If you have basic entry level gear or the most up-to-date digital automated features, the basic components are the same. By now you have already gathered that most mixers will have some way to plug in a bunch of cables going to and from the snake as mentioned earlier.  (in small clubs you might not need the snake at all, but you still plug cables into the inputs on the mixing console).

So, once everything is connected to your two independent sound systems, what do you first?  Take a good look at the mixing board. Take your time.  If this is the first time you get to see the board you will be using (maybe it was rented or is the house system, etc….), get a good feel for the section layout.  If you are still getting used to running sound the mixing console can be daunting.  Buttons, knobs, sliders and flashy things everywhere.  It’s connected to a bunch of other electronic boxes and there are big faders that look important.!??%#!**?!   We have done this before so let’s take a look at the basic components of the mixer and make this a lot less confusing. 

Layout.  There are a lot of knobs and a ton of buttons you don’t even see at first.  Each manufacturer will do things a little differently than the others, but if you look for the patterns you will see how each model will outline or border the different sections.  Color coding is also the biggest help if you have enough light to make out the difference in color schemes.  Yes, this is another one of those reasons you bring your own flashlight to every gig.  We know where the input section is as we have already connected the snake and sends during the initial set-up and sound check.  In the same logical order (1, then 2, then 3, then 4……..) as the cables are connected, you will see what we call ‘input channels’ on the face or front of the mixing console for each input connector.  Some boards can handle 8, 12, 16, 24 and more inputs.  In the input channel section you will see strips for each input.  The knobs and faders and buttons that affect that input channel will all be inside the border for that track or channel.  Many mixers use a vertical configuration, so tracks run up and down, not left and right.  But to make sure you do not get the wrong idea now, the BEST way to think of the input channels is TOP to BOTTOM.  We ALWAYS start mixing from the TOP of the channel.  Think of the ‘signal path’ for a moment.  The signal created by the keyboard or the microphone in front of the vocalist is sent through the audio cable to the snake.  From there it is sent directly to the mixing console.  Once connected to the mixing console, the signal will go to the TOP and FIRST knob of the input channel.  Yes, the 1st Gain Stage.  The mixing board’s major task is to balance all the different input signals, each with a different signal strength.  This is done at the TOP of each input channel.  It is the first and perhaps most important step in setting up the mixing console.  This is the gate keeper.  Think of it and a number of other knobs in the signal path to follow as amplifiers.  They can turn the volume on things up and they can turn them down.  The flute or the vocals may need more ‘gain’ than the trumpet or keyboards.  You want to get a good strong input level, but you do not want to overload the input channel here as it will affect everything going forward.  Watch the solo or input monitor levels and set it up so all inputs are within the same range.  The end result after we set the other knobs and buttons is to have all inputs so that the gain is averaged enough among all input channels that the faders on each channel are close to the prime area or level set for your console.  You do not want some instrument faders at “2 or 3”, and others at “10 or 11”!!

If the volume fader for the keyboard input channel is sitting around 2, and the 1st Gain Stage knob is turned clockwise to 8 or 9, (OR if you are getting up into the red or over load area on the level meters!!) turn the 1st gain stage knob counter-clockwise as needed including down all the way if you have to.  Then check the range of the volume fader and see if you can get good house levels keeping the fader fairly close to that sweet spot.  Do that for each input channel.  The input channel is also referred to as the ‘track‘ when recording.  With tracks or channels clustered or grouped as discussed earlier and with all tracks/channels properly gain staged, we can begin to look at which tracks need effects, EQ, processing, sent to monitor groups etc.  Keep in mind that changing a track’s EQ and other effects can also increase or decrease the track’s over all signal strength.  When we are setting up the board and doing gain staging, it is best to leave a little ‘head room‘, or back the 1st Gain Stage knob back a little so we do not overload the input during EQ and other signal processing.  EQ is a series on its own, but the basic premise is to make the source signal sound good or accurate.  It is better to take out frequencies that are harsh or distracting rather than turn up the pleasant ones.  Certain sounds ‘fit’ better in the mix if they have the distinct qualities of their source.  By that I mean you do not want a kick drum to sound hi-end and tinny with no low frequencies and in most situations you do not want the flute to sound like a bass guitar.  It is better to take out the low end on the flute track/channel than to leave it at center or turn it louder.  Less is more, but add EQ where needed to enhance the desired tones and make it sound pleasant and it will then fill the slot for it in the overall house mix.

Obviously when you are live and there are a number of performers and hopefully a lot of listeners depending on you for a great performance, any change in the house mix can be immediate and usually have unintended consequences that you cannot predict accurately.   Any change to the stage mix once the main speakers are pumping will not be known by the sound engineer.   If you accidently send a lot of delay to the monitor for example, it will confuse timing of players and can lead to feedback and other audio beasts raising their ugly heads over and over.  From the house board you will not be able to pinpoint where the beasts are coming from and what starts them – or calms them down for that matter. 

A lot of those buttons look alike and in the dark it is easy to move something unnoticed.  A number of times I have sneaked up on stage and listened from a few different positions to see what the band was hearing on stage.  Then I could usually identify how to deal with that beast. 

In the studio I can study some of the situations and find a solution when I can rewind and stop and try something and if that doesn’t work I can try this toy we just got in at the music store that is supposed to be wonderful and will solve all my mixing needs.   With the audience primed and ready for a show, it is better to make smaller adjustments and see how it affects everything and then adjust a little more.  If the location of the sound board is good representation of the venue and sounds pretty good, enjoy the view and mix as the band and performers deserve.  I try to reinforce guitar solos in the mains, and I mean really inforce the solo.  I make it so everyone will hear it, while keeping the other performers at a good foundation level.  I make sure I turn it back down as soon as the solo is over.   If there is a second vocalist, sometimes they do not have the power of the lead vocalist and might have a limited range.  It can be hard to boost them to the level of the lead vocalist even if they are using the same equipment.  Getting them loud enough in the monitor is usually the biggest challenge.  You don’t want to leave a microphone turned up a lot in the monitors that is not used very often.  It will pick up other instruments and sounds on stage and then push them back into the monitors…. It will probably not be loud enough to trigger feedback in the stage monitors, but it could create a boomy or foggy sound environment on stage and will make it harder for all performers to keep tight performances. 

I also like to add effects to a live performance. If the band is playing cover tunes for example, I try to match the effects on the vocals and percussion sounds with those on the original recording.  I usually keep the effects out of the monitors but have had situations where it went over well.  More often than not, it makes it more confusing on stage.  In either case, I make sure that when the song or section is over, I turn the effects level off.  If the band members talk into the microphones during a musical break, they will be clear and understandable in the audience during the address.  Then right back up when the next song or section begins.

When setting up the channels on the mixing console, I try to group instruments to make balancing all tracks easier.  I keep vocals together, and try to represent placement on stage. If there is a lead singer center stage and a back-up vocalist left right and the drummer also sings, I have the channels on the snake match their positions when looking at the stage left to right, for example.  If there is only one singer and I have open channels I do not need, I try to separate the vocalist from other channels in use so it is easy to find and easy to adjust.  You will probably change the lead vocalist channel more than any other.  The typical band might have a soloist – guitar or keyboards for example, and you will change the volume faders during the night.  But you will probably not change the delay patch or change reverb on instruments.  The vocals can benefit from minor changes throughout the night. 

Think about it… the guitar player and keyboard player change their sounds literally from song to song.  The vocalist does not have that luxury.  Change the effects to enhance the vocalist.  Too often sound gurus find one effect and use it all night.  If you are not comfortable with creating or even changing effects with the available or on-board FX, that is understandable.  Maybe we will cover that in later sessions if members find it helpful.  If effects are new to you or you have not mixed a whole lot of events try the following simple strategy; add effects to the instruments that need it and not to any other instrument, and keep the volume of the effects subdued in the house mix.  It should not overpower the stage sound or ‘dry‘ signal.   Use short reverbs and delays for most applications.  I bring in the effects into an open channel if available, rather than using the FX return knobs.  This way I can easily see the level of the effect, I can route to the vocal group or bus if I choose and I can EQ effect independently.  This to me also makes it easier to turn down the effects during music breaks or announcements.