Posts Tagged ‘#atari’

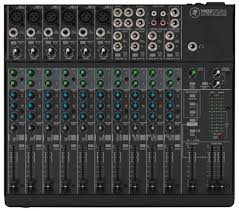
The sound board or audio mixer represents the hub in most audio mixing and mastering functions.  everything connects to the board.  Even the lighting system will use channels in the snake to connect from stage to console.  Things get plugged into and things get plugged out of the mixer as needed.  Today’s mixers are blue tooth USB WiFi fire-wired and light-piped together and will connect to an amazing array of devices.  So far we have focused on what gets plugged to the Inputs of the sound board.  There are a number of connection possibilities for the Outputs as well. We have already discussed some of them earlier, so this can be brief as you already know a lot of this in general.

On most sound boards you have a number of analog-out options.  In earlier discussions we talked about XLR and 1/4″ cables and connectors.  These will continue to be the main ones used for outputs.  On the front or face of most mixing boards you will see a stereo headphone out.  It will usually have its own volume knob and probably a selector to pick the options to Monitor including Stereo Out, Solo, Effects Sends, Effects Returns, Sub or Groups, Auxiliary Returns, and other options.  On the back or the top of the mixing board you will see the panel for Out-put connections in different sections.  There are some rules to determine what type of Audio Cable is used and whether it is a male end or female end and whether it has two connectors or three (or more).

In the early days of mixing boards, microphones and keyboards, it was important which brand you purchased.  If you wanted to get ‘that sound’ you had to have this mixing board channel strip or that particular keyboard.  Later on the computer industry similarly shot through their early days and you had the Macintosh or the Windows PC.  If you were brought up with one you could not be talked into the other.  Most modern equipment from PC’s to Automobiles can do everything.  They all have similar platforms and emulators.  There is style and quality as there always will be, but you can get software mixing programs and microphone/guitar emulator plugins that will make your audio tracks sound like anything you want —-THEY CAN EVEN MAKE YOU SOUND LIKE YOU ARE SINGING IN TUNE!!

So if you like Pepsi, no problem.  Want Coke?  Press this button……  More comfortable using a Mac?  Go for it.

All it takes is cash, a thorough understanding of what all the terms mean and a good idea where all the buttons are?!!?

Enjoy!

I am famous for doing things the easy way and if I can, as cheap as possible.  Now that does not mean forget quality and versatility.  It means I won’t spend money on gadgets that I don’t need.  I try to run as clean a mix as possible, and making sure everyone gets heard.  If they are up there ‘playin it‘, I want the audience to hear it.  In reality, it doesn’t take a lot of gadgets to accomplish those two major things; make it sound good and loud enough for the venue, and put all instruments/vocals/strings/spoons or tambourines, I don’t care what it is….  in the mix.   As a band member, hiring sound guys and their rigs, a number of times after sound check and a few songs of the first set, my microphone was turned down so low, no one could hear me even in-between songs.  I could not get the sound man’s attention, or anyone else’s for that matter because no one could hear me (and as a keyboard player I was usually in the back corner of the stage in the shadows Ha!).  So eventually I just adjusted the microphone stand down toward the floor in front of me.  It is easy to hit the wrong button or turn the wrong knob; happens all the time.

Remember that the sound guy cannot hear what is really happening up on stage.  Sometimes you THINK you can.  But you as the sound engineer should be the first person to know what is going wrong when it does.  Keep an eye on all performers – they will look to you first.  As a performer and studio guy, I could tell when the guitar player broke a string, or if the drum head split and when or if the drummer had too much to drink on his birthday gig.  Things will go wrong but a lot of the time it is the sound guy.  You make an adjustment and grab the wrong knob.  They all look alike in the dark part of the venue or room.  The consequences can be anything from a non-event to a full blown crisis, depending on which knob you grab.  Obviously for the extreme crisis, you will know right away what happened and will probably be able to correct quickly.

It is the slow creepy ones that will get you.  Two songs later something changes on stage and chaos begins.

I suggested we set up the mixing board so the FX Returns are plugged into open channels so you can control their volume with the faders rather than the FX Return knobs.  I always turn the effects down in-between songs.  (you also get EQ and other benefits)  This makes it SOOO much easier to see in the dark clubs. I also use the sub-groups to assign drums, vocals, and other groups of mics their own fader that feeds directly to the Main Out or house out.  If there is a problem with one group, you can quickly test by adjusting that sub-group fader and see if problem goes away.  If not, return it to where it was and go to the next sub-group.  This way you do not have to go through fader after fader searching for a bad signal or feedback loop.   Once you narrow down the offending group, you will have a much better idea what the source is!

I would say most live performances the sound board is mixed to a Mono output.  In smaller rooms or clubs, I loved running in stereo.  I mixed for keyboard progressive bands a lot and the stereo keyboards and samplers consumed the rooms when mixed right.  Not in volume——– The vocals (sometimes three sometimes five in the band) panned as well.  Overkill in a way, but not much work and easy to arrange with equipment versatility.  Most boards have stereo FX that can add lot to the imaging.  But again, that is not the norm.  So you can either set board up in stereo and have the Main Output plugged into the MONO OUT to your system, or you can mix to mono and use one Main fader or the other.  That’s about it.  We have covered the entire mixing board, in its basic format.  Headphone outs, Tape or other inputs, on-board effects, Solo or Audition functions as well as digital features make new sections.

Oceans of Oil” (@) MSK 1989

You go through life,

And I don’t complain.

Good things die

The rest stays the same.

Politics and money

Garbage is king.

The Liberty Bell

Doesn’t even ring.

Oceans of Oil, tinsel stars

Clouds are dark – the air is sick.

Swarms of people like killer bees

Mother Earth is on her knees.

You believe what you feel is right

And now you are going to make a fight.

You have no idea what we’re going through

If it’s your choice, nothing else will do.

Oceans of Oil, tinsel stars

Clouds are dark – the air is thick.

Swirling with pain and lost emotion

Mother Earth may soon need that abortion.

You believe that what you feel is right.

Clouds are dark.

https://itunes.apple.com/us/album/retrograde/id962542260

As someone who truly loves the outdoors and nature (for a city guy!) I sometimes think there is no end to the way we have devastated the natural resources we were blessed with.  Environmental tragedy after another, corporate greed and individual apathy seem to be everywhere at once.  This is a disturbing and dark look (from my perspective) at what we are doing to our planet.

The music is rich with textures and soundscapes.   One of the tricks I used was on the sound of the ‘toms’ as they repeat, the tuning changes and gets lower and lower.  This is a simple MIDI trick.  there are ways of doing this that can take a bit of time and planning, but what I did was very simple.  As in the past, I use the keyboard to trigger the drum sounds when recording drum tracks.  I recorded the simple beat with the tom sound.  Then when I played it back, I started recording on the same track and used the keyboard ‘pitch bend’ stick to slowly lower the pitch as it played.  That took about two seconds and once that was done during playback the drum toms would sound like they were being de-tuned in real time.  Depending on how quickly the stick was moved, you could change the rate of pitch change.

My wife sings the melody and I add some vocal phrases and back up.  To get her vocals to punch through the mix even though her vocals are smooth, I took a direct out (really it was an insert cable and we will get into that later) and fed her vocals into one channel of a stereo compressor/limiter to compress or ‘squash’ the levels, then I took the out put and ran it into the other (stereo side) side and used the limiter function.  This allowed me to get a good signal by lowering the hot portions of the vocal track, and then pump it up to the point that the limiter would stop extreme levels from getting past a threshold point I set.  I got a very clean vocal signal and smoothed out the peaks and valleys of the volume levels, allowing me to turn up the over all volume in the mix without distortion.

As we continue down the signal path, we get to a new section.  This is separated from the EQ section and generally uses a different color coding for the associated knobs.  The next group is the Aux Sends.  Each send represents an output jack that will go to external audio sources. One example would be the stage monitor mix(s).  If you have two monitors on each end of the stage serving performers, you can use Aux Send 1 going to the left monitor and use Aux Send 2 going to the right monitor.  If performer 1 wants to hear themselves and a little bit of performer 2 in the same monitor, simply send a lot of performer 1’s channel to Aux Send 1 and a little of the performer 2 to the Aux Send 1.  If performer 2 does not want to hear performer 1 in their respective monitor, simply turn up performer 2’s channel Aux Send 2 up a bunch and do not turn up Aux Send 2 on the channel for performer 1.  That was probably harder to say correctly than actually doing it.

Three

You can use Auxiliary Sends to route a signal from any channel to external effects boxes like Digital Delays, Reverbs, and even recording devices in a pinch.  You can use it to trigger light boards that have an Audio Input mode.

These Auxiliary Sends can sometimes be switched from Pre to Post.  Some are fixed either way.  This can also get confusing but if the channel Aux Send is in Pre mode it means Pre-Fader.   The volume faders on each channel will affect the level of the signal that is sent to the House or the Main Out of the mixer and when selected, to the headphone out.  It is a good idea to solo instruments in the headphones to pick or change microphone locations and isolate room noise and other performers.  If the Aux is set to Pre-Fader, it means that the Aux Send levels will be determined before the channel fader has any effect.  Turn the channel volume fader all the way down and you will still have plenty of signal going to the Aux Send.   If the Aux Send is in Post Fader mode, the amount of signal sent to the Aux Send for that channel will be directly affected by the level of the channel volume fader.  Fader off = no Aux Send level.  The number of sends will vary widely.  In this case, more is better!

At this point the example starts a new section.  This will affect the Main Out section.  This is where we can set the stereo Pan position, Mute or un-Mute the channel, and Solo the instrument for gain staging and troubleshooting during a performance.  When running in stereo, general rule is very low frequencies get panned to center.  After that, adjust to performance and venue.  Sometimes the stage sound is very loud, and listeners close to the stage will only be able to hear that performer.  Sometimes the shape of the stage or design of venue will require creative solutions using stereo panning.

This strip includes a pair of colored LED’s for signal strength and Peak warning level indicators.  Occasional red for short periods of time are OK, but better to avoid as long as you have a strong signal otherwise.  After we have set the various knobs correctly and have good signal strength, we can use the channel volume fader to set the level of that channel in the House mix.   Channel Mutes can have different affects.  Some boards Muting a channel will stop that audio source from all outs, and some might allow Aux Send 1 & 2 for monitors.  See manuals for lots of details I cannot cover in these articles.

Other examples below with different lay-outs;

TwoOne

But here is the good news;  we have just learned 75% of the face of the mixing board.  Each channel duplicates what we just went over.  All those knobs are now grouped logically, easily identified explained and we understand what each one is for.  Here on in it is repetition for gain staging and sound check.  Use Pad and 1st Gain Stage to adjust signal strength, add or subtract frequencies using the channel EQ, set amount of Aux Send to monitors and effects and set the stereo field positions as we watch level indicators and set channel volume fader.  Repeat.  Finished!

Next we can go over the benefits of Group Sends and the other 20%

Recently I was asked in comments (The Observer) if a song I posted was recorded at home or in a studio.  I replied but thought I might expand on that a bit and also introduce another version of “The Pleasure Tax”.  As my brother and I got older we kept writing poems that were now almost always designed to be lyrics.  We got better.  Instead of playing the bongos, I played the toy organ I mentioned and everything else from there.  Here is where I get to also blame my parents again.  For Christmas we all got cool toys, but many of mine seemed to be music makers; recorders, tiny piano ‘tinkley’ toys, little ukuleles and eventually guitars with plastic strings and a drum set that was made for a three year old, but you get the point.  So we got better and we played instruments and my brother started playing guitar as well.  We had more toys to create music so when we wanted to record them (I was probably fourteen or fifteen by the time recording was a possibility) we wanted to add the various instruments and record them all together.

Through the years, we met other musicians and became great friend – or as I seem to recall – we met great friends that were also musicians.  Eventually there was a central core of serious song writers.  Sometimes there would be around eight or ten core writing members.  It would seem there was a competition going (and there always was!) to write the coolest or most clever or the most groovy song.  And we would have friends that would stop by and jam once in a while or would write lyrics and were willing to turn them over to a group of people that would fit them , with force if necessary, with a musical arrangement, melody line and harmonies.

The rambling link to all this is when we often played a collection of each other’s songs, we more than likely played with different performers supporting a few core members.   Those were exciting days!  One time you would sing the song and the lead vocalist was not there.  So you let an ‘orbiting member’ do the vocal melody and you sing the harmony part.  Most of us played instruments and sang – especially if we wrote the song as you can guess – so if the lead vocalist also played guitar, we filled in as a ‘core member’.   On one visit or jam session you performed and sang your song all by yourself to the group.  In other visits you were surrounded by full instrumentation and a choir of vocalists!  So here is an example of all that tied into a version of this song by a full band I toured with.  You heard us play live to an audience in Texas when we played the original song “Our Bodies Move” posted earlier.  We also played other original songs and snuck them into our sets.  One of them was “The Pleasure Tax”.  We called ourselves The Personal Touch.  Ric and I were a duo and when we decided to add a female vocalist as recommended by a booking agency they decided to sign us up for out of state gigs.  We got some studio time when signing up and we performed some original tunes and some cover stuff…. done The Personal Touch way.  “TPT” by TPT!

So this is rare original song of mine that was recorded in an actual studio.    We are a trio and there was a studio drummer.   Everything else is The Personal Touch with a very new vocalist.

SCN_0001

Now that we are back to audio channels, see the examples below.  Remember, that the channels run down from the TOP.  In some mixing boards, there is a ‘pad‘ switch – it could be above or below the 1st gain knob – that can determine which input type will be monitored by that channel and it can also change the input level or signal strength.  To reinforce the general definition below, if the audio source uses a battery or gets plugged into AC, it will need to be ‘padded‘ using this switch, where MOST microphone applications will not be strong enough if the channel is padded.

Whatever is plugged into the input jack on the mixer for that channel will send a signal to the 1st ‘gain stage‘.

This acts more like a flood gate than an amplifier in that it allows you to reduce the strength of the signal coming into that channel.  But it feels like an amplifier as when you turn it clock wise – it gets louder and if you turn it counter-clockwise – it gets softer or lower in volume……  This is the great balancer.  This knob determines how much of the signal gets distributed or sent to other out puts, effects, processors and recording devices, etc.  This is the foundation of the mix you are creating.   We start here and do not continue with the other knobs and gizmos in the ‘channel strip‘ until this is set correctly.

The biggest trick in setting this up for most band performances is – well – band members.  A lot of them do not trust the sound guys they have worked with for a lot of reasons.  Some performers will set their level (amp, energy, settings) really low during sound check, knowing once the sound is going they can turn themselves up so they can hear themselves.  Most often, it is just difficult to play really hard and loud like you will during a full band live performance when no one else is making noise.  Knowing all that, you need to start with a good level here so you can set the gain stage properly.  Generally, open microphones will need more gain than instruments like keyboards or mp3 players.  Things that get plugged into AC or use a battery will probably have a stronger signal strength than those that go directly to the snake/mixing board.

As a caution again, make sure the amplifiers are turned all the way down before you plug anything into the mixer once the full system is connected.  We tested the House PA and Stage monitors before the band got here, so before you start plugging in instruments and performers, turn the House PA amplifiers down.  I also turn the Monitor Sends down all the way so you do not hit the monitors with some pretty ugly sounds.  If you use fantom power for your microphones or other devices, I have heard people suggest you do the same whenever turning this function ON or OFF.

Now we are ready to move through the rest of the channel.  I am old school, and I like to start with the mixing board ‘clean’.  With all knobs and gizmos set to center or neutral.  Some guys like to start off where they left or pre-mix, but I have seen many situations where that theory gets yanked.

Above board design has the +48 fantom power switch.  When pressed in it will send appropriate voltage to the microphone or device.  Best to have Master faders turned down during this part as well.  Underneath is the pad/Line switch.  This you can safely determine a good guess in advance depending on what type of instrument is plugged into that channel.  You can always start with pad pressed in and gain stage at minimum to be on the cautious side and then release pad and turn gain knob as you watch the signal LED’s.  Get good performing signal as opposed to good practice level and see where the gain stage knob is pointing.  Try to get signal meters and LED’s close to the red or overload stage, and then back off the gain stage knob just a little.  We may need the extra head room when we add EQ, use ‘inserts‘ etc.

This board and many others offer a HPF (‘High Pass Filter‘).  When depressed it will allow mid and high frequencies to go through the channel and process normally.   So, it really cuts or turns down the really low end signals.  This is where the frequencies and ranges of instruments in an earlier LSR series come into play.  Instruments like, flutes, acoustic guitars, vocalists, cymbals, snares cannot make sounds in the low end.  The over-all mix will benefit if you use the HPF and cut the very low frequencies on those instruments.   Microphone stand rumble, bleed over from the kick drum into the snare along with a number of other unwanted sounds can be eliminated before they even get into the mix.

Next series we will continue down the signal path.

Here is an instrumental I want to share with you.  Much of story telling is history, and much of my history might be considered ancient history to many of you.  We take a lot of things for granted.  It is hard to imagine times without smart phones, GPS navigation devices and e-mail.  Well, it helps to imagine those times but in the music industry.  When the first synthesizers came out you could create really cool new sounds but you could only play one or two notes at a time!!!  The major studios had upped the game and could now record up to 4 tracks of audio on the reel to reel tape machines.  Computers were so slow and had such limited memory that it was difficult if not impossible to record hi-quality tracks without it crashing or losing what you just recorded.

One of those new amazing synthesizers was from Moog.  Even now you will probably recognize songs that used these new machines.  Moog Swing is an instrumental I wrote in honor of the Moog sounds, although I did not own one.  I programmed one of my tone generators to get as close as I could to mimic the classic Moog sound.  This is all MIDI tracks recorded on the Atari 1040ST.  I would have to look at my track-sheet notes to confirm, but I think the drum sounds came from a Yamaha RX15 drum machine.  This is the same drum machine I used on the road in Corpus Christie Texas and you can hear it again in the song “Our Bodies Move” from my earlier post.  Today, modern samplers and PC program plug-ins attempt to offer the popular sounds from the ancient tone generators and keyboards in wave play-back programs, but it is nothing like the real thing.


This probably won’t be the last time I will mention that I like to teach things that I have learned over the years.  But I also like to learn.  I did OK in school, but nothing really interested me, so I just made it through.  At the right time in my life, I found music.  From my parents, TV, brothers and back then AM radio, I absorbed all the songs I could.  Back then they did not pre-package and filter music in the same way they do now,  You could hear unique styles and among the commercial sounding and cookie-cutter pop tunes there were really talented songwriters and performers.  Recordings were also hit and miss, with wide varieties of textures.  We were still waiting for “stereo” to come out.   Fun times!

I bring part of this up to say the following:  I am just a guy.  I have no formal training, I haven’t gone to technical schools,

I have not worked with national major players and unless you hang out in my town, you probably do not know the names of the bands, writers and performers I have been blessed to know.   I wish you did.

I also know a lot of very smart guys that have all the answers and references ……

Then there is the group that THINK they have all the answers but never get things to work or things sound bad and get worse as the evening goes on.

The best way in my opinion to truly know what you have learned is to teach it to someone else.  (if you can!)

I do not think another series about which knob you should turn, which special new box you should buy, which new instrument will get you to the next level, or which processor do you add to a particular instrument is going to add to what is already out there.  I would like to give you a feel of options and let you figure out on your own why ‘it doesn’t work’ or if ‘it sounds bad and gets worse’.  As described in earlier my LSR series, a number of live sound tragedies could be avoided if the sound engineer understood the challenge from both points of view.  Too many sound men and women mix to the House.  It is extremely important to mix for the Stage as much as the House.  More on that later.

Once you know why it is not working or not sounding as good as you want, you will be able to fix or improve the mix much quicker.  There are tricks that will help there as well.  I picked up a few from here and there, started writing songs with my older brother, bought a 4 track reel-to-reel and a couple Radio Shack microphones (that were great and I still have one in my mic case!!).  After that of course we needed guitars, drums, organ, and I am still living at home.  I had to figure out how to get them all to work together because back then I was the ONLY person I knew that had anything like recording equipment.  Necessity is the Mother of Invention and I kept going until I figured it out.  Once friends and their friends knew I could figure their stuff out, I got to know a lot of musicians.  Then I got into sales.  One thing leads to another.

Setting up the sound gear for a live gig, the beginning part before you even plug in the equipment, creates the foundation you will need to have a problem free event.  IF we understand what the foundation is there to do, the building or pyramid can get as tall as you want, and you will not have to worry about it crashing down on everyone around you.   Here is where we need to focus or channel in on the foundation itself and the ways to build a strong audio reinforcement base.  This is why I truly believe if I can learn it, so can you.  Next series we will talk about the other type of audio channel.

Ideas from songs can and should come from all sorts of things.  I try to observe experiences from other people.  Too many writers base their material on their own personal experience.  This is powerful but has serious drawbacks.  One has to experience nirvana or tragedy in order to write about it.  This can be limiting unless you have a very tumultuous life.  Not good for health and well being of the artist.  So I try to empathize, sympathize and understand the thoughts, mood and feelings of others as they experience life changing events.

I had been a musician with limited access to toys for most of the early years.  Lots of time and not much cash or resources available.  That did not stop me from observing others, and in fact probably offered me the time to observe.  Anyway, a friend of mine and I were walking around and I noticed a person in a wheel chair.  There was another person behind pushing the chair, but something seemed a little unusual for some reason and I kept watching the pair.  IWE naturally thought the person pushing was there to help the person in the wheel chair.  They went up to one of those bank ATM’s and much to my surprise, the person in the wheel chair moved out of the way and the walking person went up to the ATM display.  What moved me to write this song was the fact that I had originally assumed the person walking was assisting the person in the wheel chair.  The person standing started to use the ATM and they searched by hand for the braille instructions!  The person walking was blind, and being assisted by the person in the wheel chair!  We can touch others in so many different ways.  That lead me to the lyrics and a better understanding of human beings.  Not just their ability to assist others in ways we might not think of, but also how we (I) perceived something and came up with the wrong conclusion.  I use a phrase that describes that effect;  Many people have the correct observation but come to incorrect conclusions.  This song, the lyrics and the music, mean a lot to me personally.  I truly hope you find something here you can relate to.

http://www.cdbaby.com/cd/perigee