Posts Tagged ‘# mixer’

I want to give you an idea of perspective on some of the articles I have posted and will continue to post going forward.  This is the first video I have posted and while it is rather BORING, it is so informative at the same time.  I guess I have recorded original tunes since the very late 1960’s.  I recorded everything.  I deleted a lot!  But I recorded everything I could.  I experimented and adjusted and re-did and failed a few more times than I succeeded in the early days to be sure!  I also got into photography and then into video recording.  I practiced the mundane over and over until I got the exposure right, then with video until I could zoom and focus manually.  I joined the photography club in high school and learned to develop and enlarge my own pictures – something I thought was close to magic back in the day!

I shared earlier that I used (and still own!!!) what I think was the first personal computer to come out with built in MIDI ports – The Atari ST!  I used a software program back then to record the MIDI tracks and I could generate SMPTE time code and send a signal from the Atari to sync it up with recording machines (I had the Yamaha 4 track CASSETTE recorder during most of this).  When I talk about old technologies and how we used to record songs (or develop pictures…) It is hard for some to understand the challenges we had and the lo-fi quality of the final mix or product.

I want to use this video as an example of many things I refer to in this blog.  In this video, you will see what I saw when looking at the Atari computer monitor when I was playing or recording tracks.  Keep in mind this is all MIDI equipment available years ago.  The song I posted earlier will now be stripped of all guitars, vocals, effects and additional live sounds you heard on the full mix.  As you watch the video you will hear the sequences being played back live into the VCR input.  I took the monitor video out and connected to video in of the video recorder so this is a straight feed for both.  In the recording software, each “instrument” has a separate track.  Drums are all on one track with additional percussion sounds on different tracks, and as a reminder, each note (as triggered from my DX7 keyboard) represented a different drum/percussion sound coming from a drum machine.  You can hear the metronome from the Atari ticking away in the back ground as it is set to record.  As each track plays you can see the musical notes light up depending on the intensity of the track information.  You can also see the tempo of the song, the names of the tracks and the measures and beats as they click by.

The main piano sound is probably familiar to many of you even if you are quite young. It is the classic Piano Tine sound from the Yamaha DX7 synthesizers.  This video should also give you a sense of quality and resolution available at the time.  It might be difficult to hear the difference in song recording quality today, but we are all familiar with video resolution and HD cameras and large screen TV and computer standards available now.  Just think how this applied to the audio quality back then and then play some really old songs you grew up listening to.   It gives a better appreciation and perspective for some of the classic songs that seem to live forever.

 https://itunes.apple.com/us/album/touch-down/id962542289

For me, sequencing is fun and very versatile.  I am not the kind of keyboard player that can jump in on any song and just start jamming.  I do better if I can take my time and learn, practice, and improve before practicing with a full band.  A lot of this might be from the lack of confidence in the early days, but in reality I find myself a jack of all trades and master of none.  If I had spent more time on any one instrument, I might have gotten pretty good.  Fortunately – or unfortunately, I have always been interested in so many different things that my chops were not the best.  As a percussionist, I was able to hear what I wanted, but did not play drum kits so my feet and hands were always locked in perfect step!  Sequencing gave me the ability to lay down rough performances on the keyboard (and remember I use the keyboard keys to ‘trigger’ the drum sounds, so I am still playing keys).  Once recorded using MIDI – again I am not recording the sounds but the physical action and movements, I could enter the Edit Mode on the sequencer and make corrections to timing, notes, durations etc. until the piece felt good to me. For the drums, the standard practice is to use the Quantizing feature (I can go into this later as well for future posts) to make sure all beats were perfectly ‘on the grid’.  I have used drum machines and sequencers since they first came out.  The sounds are great but too often the result of overusing the quantize feature makes the drum tracks sound mechanical – unmoving – and even impossible for a real drummer.  I preferred to leave a little slop here and there.  I want emotion in my songs, not perfection.

In “Bassics”, I just enjoyed the new sounds I had and played with this Bass Guitar patch and came up with the basic groove.   I like adding textures and unusual percussion/FX sounds to keep the songs flowing and changing.  Available sounds are so much better now, but I still enjoy bringing out these old tunes.

The sound board or audio mixer represents the hub in most audio mixing and mastering functions.  everything connects to the board.  Even the lighting system will use channels in the snake to connect from stage to console.  Things get plugged into and things get plugged out of the mixer as needed.  Today’s mixers are blue tooth USB WiFi fire-wired and light-piped together and will connect to an amazing array of devices.  So far we have focused on what gets plugged to the Inputs of the sound board.  There are a number of connection possibilities for the Outputs as well. We have already discussed some of them earlier, so this can be brief as you already know a lot of this in general.

On most sound boards you have a number of analog-out options.  In earlier discussions we talked about XLR and 1/4″ cables and connectors.  These will continue to be the main ones used for outputs.  On the front or face of most mixing boards you will see a stereo headphone out.  It will usually have its own volume knob and probably a selector to pick the options to Monitor including Stereo Out, Solo, Effects Sends, Effects Returns, Sub or Groups, Auxiliary Returns, and other options.  On the back or the top of the mixing board you will see the panel for Out-put connections in different sections.  There are some rules to determine what type of Audio Cable is used and whether it is a male end or female end and whether it has two connectors or three (or more).

In the early days of mixing boards, microphones and keyboards, it was important which brand you purchased.  If you wanted to get ‘that sound’ you had to have this mixing board channel strip or that particular keyboard.  Later on the computer industry similarly shot through their early days and you had the Macintosh or the Windows PC.  If you were brought up with one you could not be talked into the other.  Most modern equipment from PC’s to Automobiles can do everything.  They all have similar platforms and emulators.  There is style and quality as there always will be, but you can get software mixing programs and microphone/guitar emulator plugins that will make your audio tracks sound like anything you want —-THEY CAN EVEN MAKE YOU SOUND LIKE YOU ARE SINGING IN TUNE!!

So if you like Pepsi, no problem.  Want Coke?  Press this button……  More comfortable using a Mac?  Go for it.

All it takes is cash, a thorough understanding of what all the terms mean and a good idea where all the buttons are?!!?

Enjoy!

I am famous for doing things the easy way and if I can, as cheap as possible.  Now that does not mean forget quality and versatility.  It means I won’t spend money on gadgets that I don’t need.  I try to run as clean a mix as possible, and making sure everyone gets heard.  If they are up there ‘playin it‘, I want the audience to hear it.  In reality, it doesn’t take a lot of gadgets to accomplish those two major things; make it sound good and loud enough for the venue, and put all instruments/vocals/strings/spoons or tambourines, I don’t care what it is….  in the mix.   As a band member, hiring sound guys and their rigs, a number of times after sound check and a few songs of the first set, my microphone was turned down so low, no one could hear me even in-between songs.  I could not get the sound man’s attention, or anyone else’s for that matter because no one could hear me (and as a keyboard player I was usually in the back corner of the stage in the shadows Ha!).  So eventually I just adjusted the microphone stand down toward the floor in front of me.  It is easy to hit the wrong button or turn the wrong knob; happens all the time.

Remember that the sound guy cannot hear what is really happening up on stage.  Sometimes you THINK you can.  But you as the sound engineer should be the first person to know what is going wrong when it does.  Keep an eye on all performers – they will look to you first.  As a performer and studio guy, I could tell when the guitar player broke a string, or if the drum head split and when or if the drummer had too much to drink on his birthday gig.  Things will go wrong but a lot of the time it is the sound guy.  You make an adjustment and grab the wrong knob.  They all look alike in the dark part of the venue or room.  The consequences can be anything from a non-event to a full blown crisis, depending on which knob you grab.  Obviously for the extreme crisis, you will know right away what happened and will probably be able to correct quickly.

It is the slow creepy ones that will get you.  Two songs later something changes on stage and chaos begins.

I suggested we set up the mixing board so the FX Returns are plugged into open channels so you can control their volume with the faders rather than the FX Return knobs.  I always turn the effects down in-between songs.  (you also get EQ and other benefits)  This makes it SOOO much easier to see in the dark clubs. I also use the sub-groups to assign drums, vocals, and other groups of mics their own fader that feeds directly to the Main Out or house out.  If there is a problem with one group, you can quickly test by adjusting that sub-group fader and see if problem goes away.  If not, return it to where it was and go to the next sub-group.  This way you do not have to go through fader after fader searching for a bad signal or feedback loop.   Once you narrow down the offending group, you will have a much better idea what the source is!

I would say most live performances the sound board is mixed to a Mono output.  In smaller rooms or clubs, I loved running in stereo.  I mixed for keyboard progressive bands a lot and the stereo keyboards and samplers consumed the rooms when mixed right.  Not in volume——– The vocals (sometimes three sometimes five in the band) panned as well.  Overkill in a way, but not much work and easy to arrange with equipment versatility.  Most boards have stereo FX that can add lot to the imaging.  But again, that is not the norm.  So you can either set board up in stereo and have the Main Output plugged into the MONO OUT to your system, or you can mix to mono and use one Main fader or the other.  That’s about it.  We have covered the entire mixing board, in its basic format.  Headphone outs, Tape or other inputs, on-board effects, Solo or Audition functions as well as digital features make new sections.

As we continue down the signal path, we get to a new section.  This is separated from the EQ section and generally uses a different color coding for the associated knobs.  The next group is the Aux Sends.  Each send represents an output jack that will go to external audio sources. One example would be the stage monitor mix(s).  If you have two monitors on each end of the stage serving performers, you can use Aux Send 1 going to the left monitor and use Aux Send 2 going to the right monitor.  If performer 1 wants to hear themselves and a little bit of performer 2 in the same monitor, simply send a lot of performer 1’s channel to Aux Send 1 and a little of the performer 2 to the Aux Send 1.  If performer 2 does not want to hear performer 1 in their respective monitor, simply turn up performer 2’s channel Aux Send 2 up a bunch and do not turn up Aux Send 2 on the channel for performer 1.  That was probably harder to say correctly than actually doing it.

Three

You can use Auxiliary Sends to route a signal from any channel to external effects boxes like Digital Delays, Reverbs, and even recording devices in a pinch.  You can use it to trigger light boards that have an Audio Input mode.

These Auxiliary Sends can sometimes be switched from Pre to Post.  Some are fixed either way.  This can also get confusing but if the channel Aux Send is in Pre mode it means Pre-Fader.   The volume faders on each channel will affect the level of the signal that is sent to the House or the Main Out of the mixer and when selected, to the headphone out.  It is a good idea to solo instruments in the headphones to pick or change microphone locations and isolate room noise and other performers.  If the Aux is set to Pre-Fader, it means that the Aux Send levels will be determined before the channel fader has any effect.  Turn the channel volume fader all the way down and you will still have plenty of signal going to the Aux Send.   If the Aux Send is in Post Fader mode, the amount of signal sent to the Aux Send for that channel will be directly affected by the level of the channel volume fader.  Fader off = no Aux Send level.  The number of sends will vary widely.  In this case, more is better!

At this point the example starts a new section.  This will affect the Main Out section.  This is where we can set the stereo Pan position, Mute or un-Mute the channel, and Solo the instrument for gain staging and troubleshooting during a performance.  When running in stereo, general rule is very low frequencies get panned to center.  After that, adjust to performance and venue.  Sometimes the stage sound is very loud, and listeners close to the stage will only be able to hear that performer.  Sometimes the shape of the stage or design of venue will require creative solutions using stereo panning.

This strip includes a pair of colored LED’s for signal strength and Peak warning level indicators.  Occasional red for short periods of time are OK, but better to avoid as long as you have a strong signal otherwise.  After we have set the various knobs correctly and have good signal strength, we can use the channel volume fader to set the level of that channel in the House mix.   Channel Mutes can have different affects.  Some boards Muting a channel will stop that audio source from all outs, and some might allow Aux Send 1 & 2 for monitors.  See manuals for lots of details I cannot cover in these articles.

Other examples below with different lay-outs;

TwoOne

But here is the good news;  we have just learned 75% of the face of the mixing board.  Each channel duplicates what we just went over.  All those knobs are now grouped logically, easily identified explained and we understand what each one is for.  Here on in it is repetition for gain staging and sound check.  Use Pad and 1st Gain Stage to adjust signal strength, add or subtract frequencies using the channel EQ, set amount of Aux Send to monitors and effects and set the stereo field positions as we watch level indicators and set channel volume fader.  Repeat.  Finished!

Next we can go over the benefits of Group Sends and the other 20%

Recently I was asked in comments (The Observer) if a song I posted was recorded at home or in a studio.  I replied but thought I might expand on that a bit and also introduce another version of “The Pleasure Tax”.  As my brother and I got older we kept writing poems that were now almost always designed to be lyrics.  We got better.  Instead of playing the bongos, I played the toy organ I mentioned and everything else from there.  Here is where I get to also blame my parents again.  For Christmas we all got cool toys, but many of mine seemed to be music makers; recorders, tiny piano ‘tinkley’ toys, little ukuleles and eventually guitars with plastic strings and a drum set that was made for a three year old, but you get the point.  So we got better and we played instruments and my brother started playing guitar as well.  We had more toys to create music so when we wanted to record them (I was probably fourteen or fifteen by the time recording was a possibility) we wanted to add the various instruments and record them all together.

Through the years, we met other musicians and became great friend – or as I seem to recall – we met great friends that were also musicians.  Eventually there was a central core of serious song writers.  Sometimes there would be around eight or ten core writing members.  It would seem there was a competition going (and there always was!) to write the coolest or most clever or the most groovy song.  And we would have friends that would stop by and jam once in a while or would write lyrics and were willing to turn them over to a group of people that would fit them , with force if necessary, with a musical arrangement, melody line and harmonies.

The rambling link to all this is when we often played a collection of each other’s songs, we more than likely played with different performers supporting a few core members.   Those were exciting days!  One time you would sing the song and the lead vocalist was not there.  So you let an ‘orbiting member’ do the vocal melody and you sing the harmony part.  Most of us played instruments and sang – especially if we wrote the song as you can guess – so if the lead vocalist also played guitar, we filled in as a ‘core member’.   On one visit or jam session you performed and sang your song all by yourself to the group.  In other visits you were surrounded by full instrumentation and a choir of vocalists!  So here is an example of all that tied into a version of this song by a full band I toured with.  You heard us play live to an audience in Texas when we played the original song “Our Bodies Move” posted earlier.  We also played other original songs and snuck them into our sets.  One of them was “The Pleasure Tax”.  We called ourselves The Personal Touch.  Ric and I were a duo and when we decided to add a female vocalist as recommended by a booking agency they decided to sign us up for out of state gigs.  We got some studio time when signing up and we performed some original tunes and some cover stuff…. done The Personal Touch way.  “TPT” by TPT!

So this is rare original song of mine that was recorded in an actual studio.    We are a trio and there was a studio drummer.   Everything else is The Personal Touch with a very new vocalist.

SCN_0001

We all try to rationalize situations we are not sure of.   We attempt to explain why things happen – or things that happen to us.  We try to understand the world around us.  When I worked at the instrument music store, I rationalized that I got the job because I was a previous customer and that I could program and understand the new digital MIDI keyboards hitting the market.  Very quickly (months, I believe) I was given my own satellite store to manage.  I opened three more chain stores in a few short years.  In reality, I probably bought more in equipment than I got paid to work there!  Almost kidding, but I understood a lot of the toys and had played with a bunch of them, but to get a room full of toys all day long and then get paid to learn all I could about them, well, I won’t get into religion here but that was heaven on Earth.  I would have done it for free.  And do you know how I rationalized being a SALES MAN? (I am pretty anti-establishment from way back………..) I tried to listen to where the customer was coming from and what they needed.  From there I would teach them what I knew about gear that would help get them to the next level.   Everyone needs to get to the next level.  That is what I am doing today.  It is what you are doing right now.

And sometimes we need to explain to ourselves why.   Why do I need to buy that new toy?  Why do they like me?  Why does the sun always shine where I am?  Why aren’t things working as I planned.  Why don’t they understand me?   What did I do right or wrong?  This has bugged me all my life and I hope it does not get to you.  Working in the music store(s) I sold gear to a lot of bands. Some people were regulars.  Always something needed, some new gear.  One of the bands told me that their sound man was on vacation and they needed someone to run sound for them.  It SEEEEEEMED logical to ask me, I knew about the mixing boards and PA systems.  But I had never run sound before ( truth in advertising alert – – – I did run sound for one other band prior to this but that is a funny story I wanted to share with you later.  So I did it once before  ….. technically  …….) What would you do?  These are good customers and by now good friends too.  If I run sound and really suck, the friendship and the work relationships are out the window.  I let them know I do not have a lot of experience but if they don’t have anyone else I would be glad to help.  They decide to go with me for the vacation gigs.  I run through the checklist a thousand times in my head.  I set the stage and house equipment up methodically, I run through the gain staging like riding a bike, I get the monitors working and run CD audio through the mains to test them.  Time to start.   Big crowd.   Lots of people and friends.  As you can imagine I am rapidly cycling through excitement, concern, confusion, fear, panic, and jazzed up one after the other.  The band starts playing and they are soooooo good I just relax.  I think even I can make these guys sound good!  I was lucky.  From what I remember the event was fine.

Their sound man decided to move onto other things and when he came back from vacation I was asked to take his place.  Again I had to rationalize;  well, they only like me cause I can get them a deal at the store. Well, they like me because I can set up the equipment pretty fast.   Well, it went over well because they are really tight and have great equipment.   You have probably done that a bunch of times as well.  It was hard for me to accept all the way down to the point of knowing that they noticed and appreciated the mix.  Their fans did too but most importantly, so did the band wives!  Never forget the power of the spouse!  So now for the first time, I am involved with a real band.  I am the regular sound guy.  The Band understands the power of the PA, and they determine that the sound guy gets equal cut…… as if he is as important to the overall sound as the individual band members were.  Amazing concept and it worked so well over the years.  I could not rationalize my way out of deserving that one; we worked as a team and the band always sounded great.

All this from knowing how to program a digital keyboard.

Again, there are lots of guidelines about setting EQ.  But don’t let this confuse you early on.  Basically, this is a fancy way to change the tone of the signal.  Knobs that are tied together in brackets work together. One determines the frequency range that will be affected and the other knob determines how much boost or cut will be applied to the selected frequency range.  The first instinct is to turn everything up.  Indeed this is quite natural but wrong.  Test after test, many people will say one sound is better than the other even though the only real difference is the higher or louder volume level.  If you think of boosting the frequency group with the EQ as if it were an amplifier turning the frequency group louder, this will help explain why we needed the extra head room when setting up the gain stage – you are making the signal louder when you add EQ boost.  If everything is set and you boost a channel EQ, you can unintentionally overload the input level on the EX send for example, causing that signal to distort or clip when returning back to the mix.

In this configuration there is a hi frequency group cut/boost knob.  Then there are hi-mid frequency knob tied to a cut/boost knob and below another pair in the Low-mid frequency range.  Underneath that is the low end group cut/boost knob.  In essence, select the amount of cut or boost on the frequency groups (Hi – Lo) to shape sound so it reflects the source signal.

For the paired knobs, select the frequency to be affected and using its pair cut or boost that particular frequency (as opposed to a larger group of frequencies for the Hi-LO knobs).  Keeping in mind sometimes less is really more, rather than try to turn frequencies up or louder to make them sound better, try making them sound bad.  Which frequencies interfere with the shape and tone of the instrument?  Does a certain frequency make a nasty squawking sound when it is a bit louder?  Try cutting that frequency a good amount.  You might be able to turn the channel volume up after cutting signals and keep the level not necessarily louder over-all in the mix but in the correct group or place in the instrument/vocal mix.  Listeners will be able to hear the instrument clearer and more distinctly if it closely resembles the real instrument’s group. So this gets pretty easy.  Like a simple home stereo, turn the top know to clockwise to make the sound brighter by increasing the hi frequency group.   Turn it counter-clockwise if it sounds harsh or brittle in the upper range.  The paired knobs allow you to select specific frequencies within a group (Hi or Mid) and then cut or boost to shape the tone of the source and add flavor or reduce gremlins.

For microphones that will be used by vocalists, this is an area where you can make a lot of difference because the vocalist signal is also being sent to the on-stage monitors.  Sometimes they are really loud.  And when that happens, the monitor is blaring the vocalist’s signal right back into the microphone on stage.  This in turn goes quickly to the monitor and straight at the microphone again.  Soon this will turn into a squeal in the range that is strongest or loudest.  This is the classic example of a ‘feed-back loop‘.

The knee-jerk reaction is to turn the channel volume down or turn the monitor sends down.  The better way is to learn which frequency/frequency group is triggering the loop first.  Use the paired EQ knobs to change the hi-mid or lo-mid frequency responsible for triggering the nasty loop.  Successfully done, slowly turn the volume up a bit.  Slowly increase volume (usually to the monitors, but will apply to the House Mains in some situations) until you start to hear a feed-back loop starting.  Determine which frequency it is and turn it down in the mix. You want as much clear gain as you can to the performers. If you can only turn Monitor Send up to 5, let’s say or you get feedback, the performer might not be able to hear themselves over the amplified instruments and will be forced to scream louder and louder to get heard.  If you pull down the offending frequencies you can turn the same signal to the Monitor Send to maybe 8 or so.  Happy vocalist.

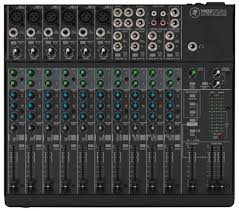
Now that we are back to audio channels, see the examples below.  Remember, that the channels run down from the TOP.  In some mixing boards, there is a ‘pad‘ switch – it could be above or below the 1st gain knob – that can determine which input type will be monitored by that channel and it can also change the input level or signal strength.  To reinforce the general definition below, if the audio source uses a battery or gets plugged into AC, it will need to be ‘padded‘ using this switch, where MOST microphone applications will not be strong enough if the channel is padded.

Whatever is plugged into the input jack on the mixer for that channel will send a signal to the 1st ‘gain stage‘.

This acts more like a flood gate than an amplifier in that it allows you to reduce the strength of the signal coming into that channel.  But it feels like an amplifier as when you turn it clock wise – it gets louder and if you turn it counter-clockwise – it gets softer or lower in volume……  This is the great balancer.  This knob determines how much of the signal gets distributed or sent to other out puts, effects, processors and recording devices, etc.  This is the foundation of the mix you are creating.   We start here and do not continue with the other knobs and gizmos in the ‘channel strip‘ until this is set correctly.

The biggest trick in setting this up for most band performances is – well – band members.  A lot of them do not trust the sound guys they have worked with for a lot of reasons.  Some performers will set their level (amp, energy, settings) really low during sound check, knowing once the sound is going they can turn themselves up so they can hear themselves.  Most often, it is just difficult to play really hard and loud like you will during a full band live performance when no one else is making noise.  Knowing all that, you need to start with a good level here so you can set the gain stage properly.  Generally, open microphones will need more gain than instruments like keyboards or mp3 players.  Things that get plugged into AC or use a battery will probably have a stronger signal strength than those that go directly to the snake/mixing board.

As a caution again, make sure the amplifiers are turned all the way down before you plug anything into the mixer once the full system is connected.  We tested the House PA and Stage monitors before the band got here, so before you start plugging in instruments and performers, turn the House PA amplifiers down.  I also turn the Monitor Sends down all the way so you do not hit the monitors with some pretty ugly sounds.  If you use fantom power for your microphones or other devices, I have heard people suggest you do the same whenever turning this function ON or OFF.

Now we are ready to move through the rest of the channel.  I am old school, and I like to start with the mixing board ‘clean’.  With all knobs and gizmos set to center or neutral.  Some guys like to start off where they left or pre-mix, but I have seen many situations where that theory gets yanked.

Above board design has the +48 fantom power switch.  When pressed in it will send appropriate voltage to the microphone or device.  Best to have Master faders turned down during this part as well.  Underneath is the pad/Line switch.  This you can safely determine a good guess in advance depending on what type of instrument is plugged into that channel.  You can always start with pad pressed in and gain stage at minimum to be on the cautious side and then release pad and turn gain knob as you watch the signal LED’s.  Get good performing signal as opposed to good practice level and see where the gain stage knob is pointing.  Try to get signal meters and LED’s close to the red or overload stage, and then back off the gain stage knob just a little.  We may need the extra head room when we add EQ, use ‘inserts‘ etc.

This board and many others offer a HPF (‘High Pass Filter‘).  When depressed it will allow mid and high frequencies to go through the channel and process normally.   So, it really cuts or turns down the really low end signals.  This is where the frequencies and ranges of instruments in an earlier LSR series come into play.  Instruments like, flutes, acoustic guitars, vocalists, cymbals, snares cannot make sounds in the low end.  The over-all mix will benefit if you use the HPF and cut the very low frequencies on those instruments.   Microphone stand rumble, bleed over from the kick drum into the snare along with a number of other unwanted sounds can be eliminated before they even get into the mix.

Next series we will continue down the signal path.

Here is an instrumental I want to share with you.  Much of story telling is history, and much of my history might be considered ancient history to many of you.  We take a lot of things for granted.  It is hard to imagine times without smart phones, GPS navigation devices and e-mail.  Well, it helps to imagine those times but in the music industry.  When the first synthesizers came out you could create really cool new sounds but you could only play one or two notes at a time!!!  The major studios had upped the game and could now record up to 4 tracks of audio on the reel to reel tape machines.  Computers were so slow and had such limited memory that it was difficult if not impossible to record hi-quality tracks without it crashing or losing what you just recorded.

One of those new amazing synthesizers was from Moog.  Even now you will probably recognize songs that used these new machines.  Moog Swing is an instrumental I wrote in honor of the Moog sounds, although I did not own one.  I programmed one of my tone generators to get as close as I could to mimic the classic Moog sound.  This is all MIDI tracks recorded on the Atari 1040ST.  I would have to look at my track-sheet notes to confirm, but I think the drum sounds came from a Yamaha RX15 drum machine.  This is the same drum machine I used on the road in Corpus Christie Texas and you can hear it again in the song “Our Bodies Move” from my earlier post.  Today, modern samplers and PC program plug-ins attempt to offer the popular sounds from the ancient tone generators and keyboards in wave play-back programs, but it is nothing like the real thing.